What Is Construction Cost Estimating?
Construction cost estimating is the process of calculating all anticipated costs for a construction project, including materials, labor, equipment, and fees. Use construction estimates to create a project budget and to guide spending decisions for keeping the project on track.

Main Types of Construction Cost Estimates
Different types of construction cost estimates correspond to each phase of a project. These include conceptual and preliminary estimates (completed during the planning phase), detailed and engineers’ estimates (design phase), bid estimates (bidding phase), and control estimates (construction phase).
You might conduct only one estimate for smaller projects, such as a new roof or a room remodel. But more complicated jobs, such as the construction of a new home or a commercial project, will involve a series of estimates. Construction cost estimates evolve in detail and accuracy as a project progresses, as more design and scope details become available.
Here are the types of cost estimates by phase:
- Planning and Feasibility Phase
- Conceptual Estimate: This estimate provides a rough, initial projection of costs based on the general idea of the project. It is often used for early decision-making, before design details are available.
- Feasibility Estimate: Use this estimate to assess whether the project is financially and technically viable by evaluating preliminary costs, potential revenue, and benefits.
- Preliminary Estimate: Get a more detailed analysis of expected costs to refine early planning and provide guidance for project adjustments.
- Budget Estimate: Establish a target budget and help secure project financing. This estimate typically relies on partial design details or historical cost data.
- Design Phase
- Detailed Estimate: This estimate breaks down project costs for materials, labor, equipment, and other elements as designs are further developed. It significantly improves budgeting accuracy.
- Definitive Estimate: This is a near-final estimate that reflects all clarified design details. It often serves as the official project budget used for approvals and planning.
- Engineer’s Estimate: This highly precise estimate is prepared by engineers and serves as a point of comparison to evaluate contractor bids.
- Bidding Phase
- Bid Estimate: This is a contractor’s comprehensive proposal. It details costs based on project plans and specifications, and you submit it competitively to win the project.
- Negotiated Bid: Develop this estimate collaboratively between the client and contractor to agree on project costs in noncompetitive situations. It is typically used for private or specialized projects.
- Construction Phase
- Control Estimate: This estimate tracks actual project spending compared to the planned budget. This estimate helps project managers identify and address variances in real time to ensure financial control. It is often supported by cost-tracking tools and detailed progress reports.
- Estimate at Completion (EAC): This estimate projects the total cost of the project by combining actual spending to date with anticipated future costs. The EAC ensures the project remains on track financially. Calculations might use the formula: EAC = Actual Costs + (Remaining Work ÷ Cost Performance Index)
ASPE Classifications: Aligning Phases with Accuracy Levels
The American Society of Professional Estimators (ASPE) uses a five-level system to classify estimates by detail and accuracy, rather than by project phases. Use ASPE’s standards alongside phased estimates to get clear expectations for cost accuracy at each stage. Doing so will help you set a realistic project budget from start to finish.
The ASPE levels are:
- Level 1: Order of Magnitude Estimate (plus or minus 20-30 percent accuracy): Similar to the conceptual estimate, this provides a broad early estimate.
- Level 2: Schematic Design Estimate (15-25 percent): Similar to the preliminary estimate, this estimate refines costs as you nail down project details.
- Level 3: Design Development Estimate (10-15 percent): Similar to the detailed estimate, it provides a clearer budget as designs solidify.
- Level 4: Construction Document Estimate (5-10 percent): Similar to the definitive estimate, create this to set the final project budget before construction.
- Level 5: Bid Estimate: This estimate matches the bid estimate, which is the contractor’s detailed proposal for the project.
How to Estimate Construction Costs
To estimate construction costs, start broadly and then dive into details. Start by observing and scoping. Next, discuss details with the client and break them down in the estimate. For bigger projects, you’ll create several estimates with increasing detail, while you may only create one for smaller projects.
Check out our roundup of free construction cost estimate templates, which includes options for specific trades, such as roofing, painting, and electrical.
Steps in Construction Cost Estimating
Most construction projects follow the same basic steps, including gathering project information, defining scope, and documenting estimations. Below, you’ll find a step-by-step guide to creating an accurate construction cost estimate for projects of any size.
1. Visit the Project Site
When a potential customer calls, your first step is to visit the project site to inspect conditions. This ensures you capture critical details that might not be evident from plans or descriptions alone. Thoroughly review what the client has in mind and basic information, such as if it is residential or commercial, big or small.

Aaron Lipman is the owner of Two Brothers Foundation Repair, a Houston-based construction company. “Always visit the site,” he advises. “Blueprints are helpful, but they don’t tell the whole story. I once estimated a repair based on plans alone, only to find a massive tree root under the surface during excavation. That surprise could have derailed the job if I hadn’t accounted for extra labor and tools.”
2. Provide Your Guidance
Clients often rely on your expertise to make informed decisions about their project. Be prepared to provide guidance on scope options and associated costs. Be prepared to answer questions such as, “What will this feature cost compared to that?” Your professional advice can shape the project’s direction and foster trust.
For more on client-contractor collaboration, see our guide on construction project planning. Also, try our free construction budget templates.
3. Define the Project Scope
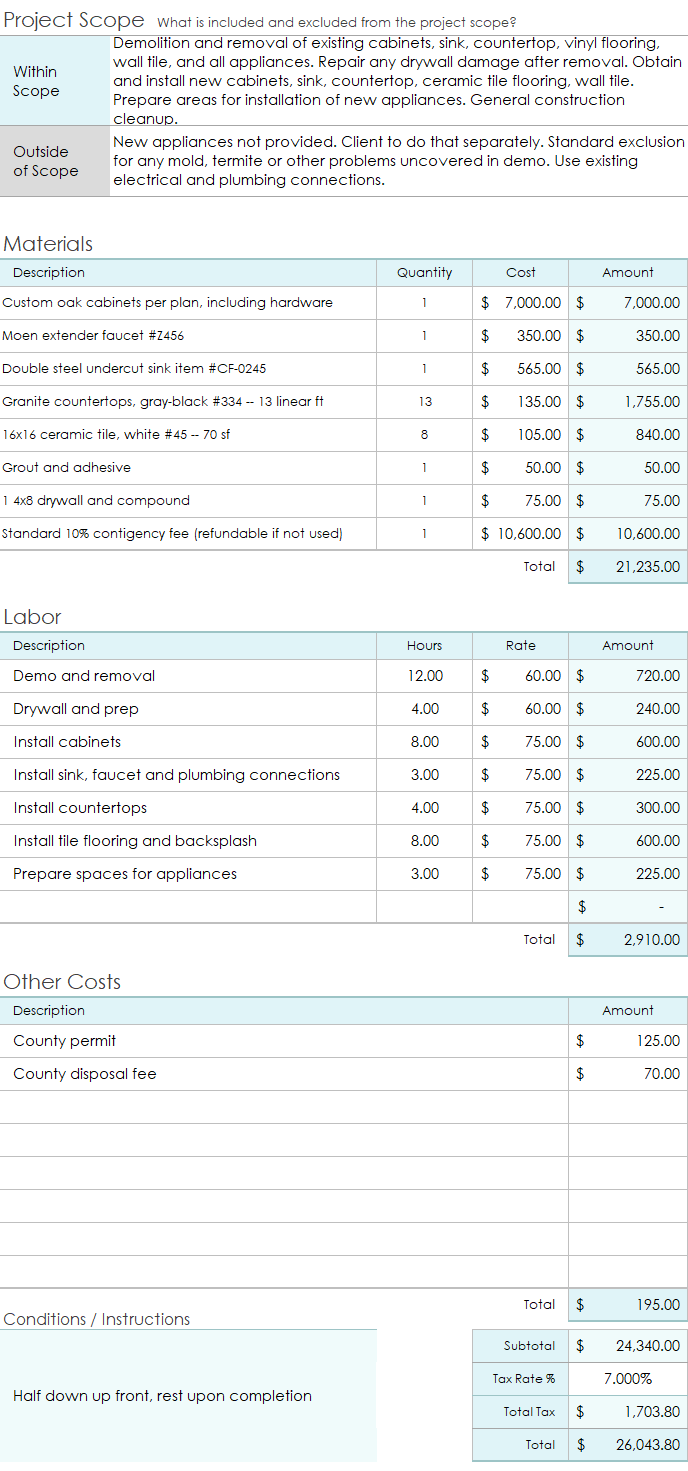
Talk to the client first to understand their expectations. Use that information to clearly define the project scope by breaking it into detailed components such as structural elements (e.g., walls, plumbing) and aesthetic features (e.g., finishes, landscaping). Review all plans with the client to confirm mutual understanding. A well-defined scope helps to minimize misunderstandings, ensure realistic budgets, and prevent scope creep during construction.
“Break the job into small, detailed parts,” says Lipman. “For example, if you’re repairing a foundation, don’t just list ‘materials.’ You need to specify whether it’s rebar, concrete, piers, and even safety gear. Early on, I made the mistake of lumping costs together, so it was hard to pinpoint where adjustments were needed when unexpected expenses came up.”
Try one of these construction project scope templates to help define your project scope.
4. Gather Information and Data
Gather accurate, up-to-date pricing for materials, labor, and equipment. Contact suppliers for quotes, check regional labor rates, and consult recent project data for benchmarks. For recurring materials or tasks, consider maintaining a cost database to streamline future estimates.
5. Select the Type of Estimate to Create
Choose an estimate type that corresponds to the project phase. Early-stage projects might need a rough conceptual estimate, while near-final designs require a detailed or definitive estimate. Tailor the estimate’s detail to what you need at the time.
6. Calculate Project Quantities
Break down the project into parts — foundations, walls, finishes, etc. — and determine the amount or quantity you need for each. This step, often called takeoff, involves counting and measuring materials to build an accurate list of costs.

“Measure everything carefully,” advises Brendan Anderson, a second-generation roofer and the owner of Brix Systems Roofing in Kalispell, Montana. “Double-check your measurements and factor in things like angles, roof pitch, and waste. When I started, I underestimated material a couple of times — it was a nightmare scrambling to get more supplies mid-project. Now, I measure at least twice and always add a little buffer.”
7. Estimate Material, Labor, and Equipment Costs
Calculate costs for each major project area. Include the price of materials (plus delivery), labor (both rates and time required), and equipment (rental fees and maintenance). These core costs form the bulk of the estimate.

Mike Falahee, President of Marygrove Awning Co. in South Lyon, Michigan, says, “Succinctly list every cost. When someone can see exactly where their money is going, they like it. For instance, in my quotation for a Marygrove-louvered roof, I always include the costs of the motorized component separately. Trust starts to grow.”

Detailed labor estimates also keep projects on track, says Chris Stevenson, sales manager for 730 South Exteriors, a Denver roofing contractor.
“Breaking labor into specific tasks, such as prepping materials, installation, cleanup, and inspections, helps ensure accuracy,” Stevenson says. “This also builds client trust because it shows them exactly where their money is going. Over time, I’ve learned how to refine these breakdowns by tracking how long each step actually takes on past jobs. This level of detail prevents surprises and keeps the budget on track.”
8. Add Overhead and Indirect Costs
Include overhead and indirect costs, such as temporary on-site utilities, insurance, and permits. While these expenses don’t directly contribute to construction, they’re essential for project management. You should accurately account for them to avoid budget shortfalls.
9. Add Contingency Funds
Include a contingency fund, typically five to 15 percent of the total project cost, to cover unforeseen challenges such as a price change in materials or an unexpected site issue. Add this financial buffer up front to avoid mid-construction budget adjustments.

Lanyon Heinemann, president of JMK Contractor, a residential general contractor in Miami, emphasizes the value of contingency budgets. “Always include a contingency budget (usually five to 10 percent) to cover unforeseen expenses. This tip has saved me more than once when projects faced scope changes or material price increases. I learned this from the hard lessons of managing unexpected project shifts early in my career.”
Lipman echoes this. “The toughest lesson is understanding and accounting for variability. Material costs can fluctuate based on supply chain issues, seasons, or even local demand spikes,” he says. “For example, after Hurricane Harvey, the cost of concrete skyrocketed, and many new estimators didn’t know how to adjust their quotes. I had to learn that locking in material prices early or working with suppliers who offer stable contracts is essential for staying on budget. Flexibility helps, but it takes experience to know when to build it into the estimate and when to rely on fixed numbers.”
10. Review and Check Accuracy
Double-check all calculations and ensure that costs reflect current market conditions. Review any complex parts of the estimate with specialists to confirm accuracy. For example, you might ask an independent supplier about the price of materials or availability or talk with an experienced estimator.
11. Record Key Notes and Exclusions
Document key decisions, assumptions, and exclusions in the estimate. For instance, note if landscaping or certain finishes are not included. Doing this work helps avoid miscommunication down the line.
12. Finalize the Estimate
Present the estimate in a clear format to stakeholders. It should summarize total costs and break down major categories. Ensure it meets the client’s expectations and the project’s financial goals. Get formal sign-off on the estimate from the client.
13. Track and Update During Construction
As construction begins, regularly compare actual costs with the target to stay within budget using estimation or a financial comparison tool. Update the estimate if prices change or you make adjustments to the project scope.
14. Keep Your Records for Reference
Keep records of all project estimates, supporting documentation, and final costs. These records are invaluable for the following:
- Audits: Detailed records help you demonstrate compliance with financial and contractual obligations.
- Dispute Resolution: Documentation of past decisions, pricing, and scope clarifications protects your team against misunderstandings with the client.
- Future Projects: Use past data as benchmarks to refine accuracy.
Use cloud-based construction management software to securely archive this information. You can also review past estimates to refine your process and improve future accuracy. For more, read our guide on construction estimate methods.
Construction Estimating Starter Kit for Small to Medium Businesses
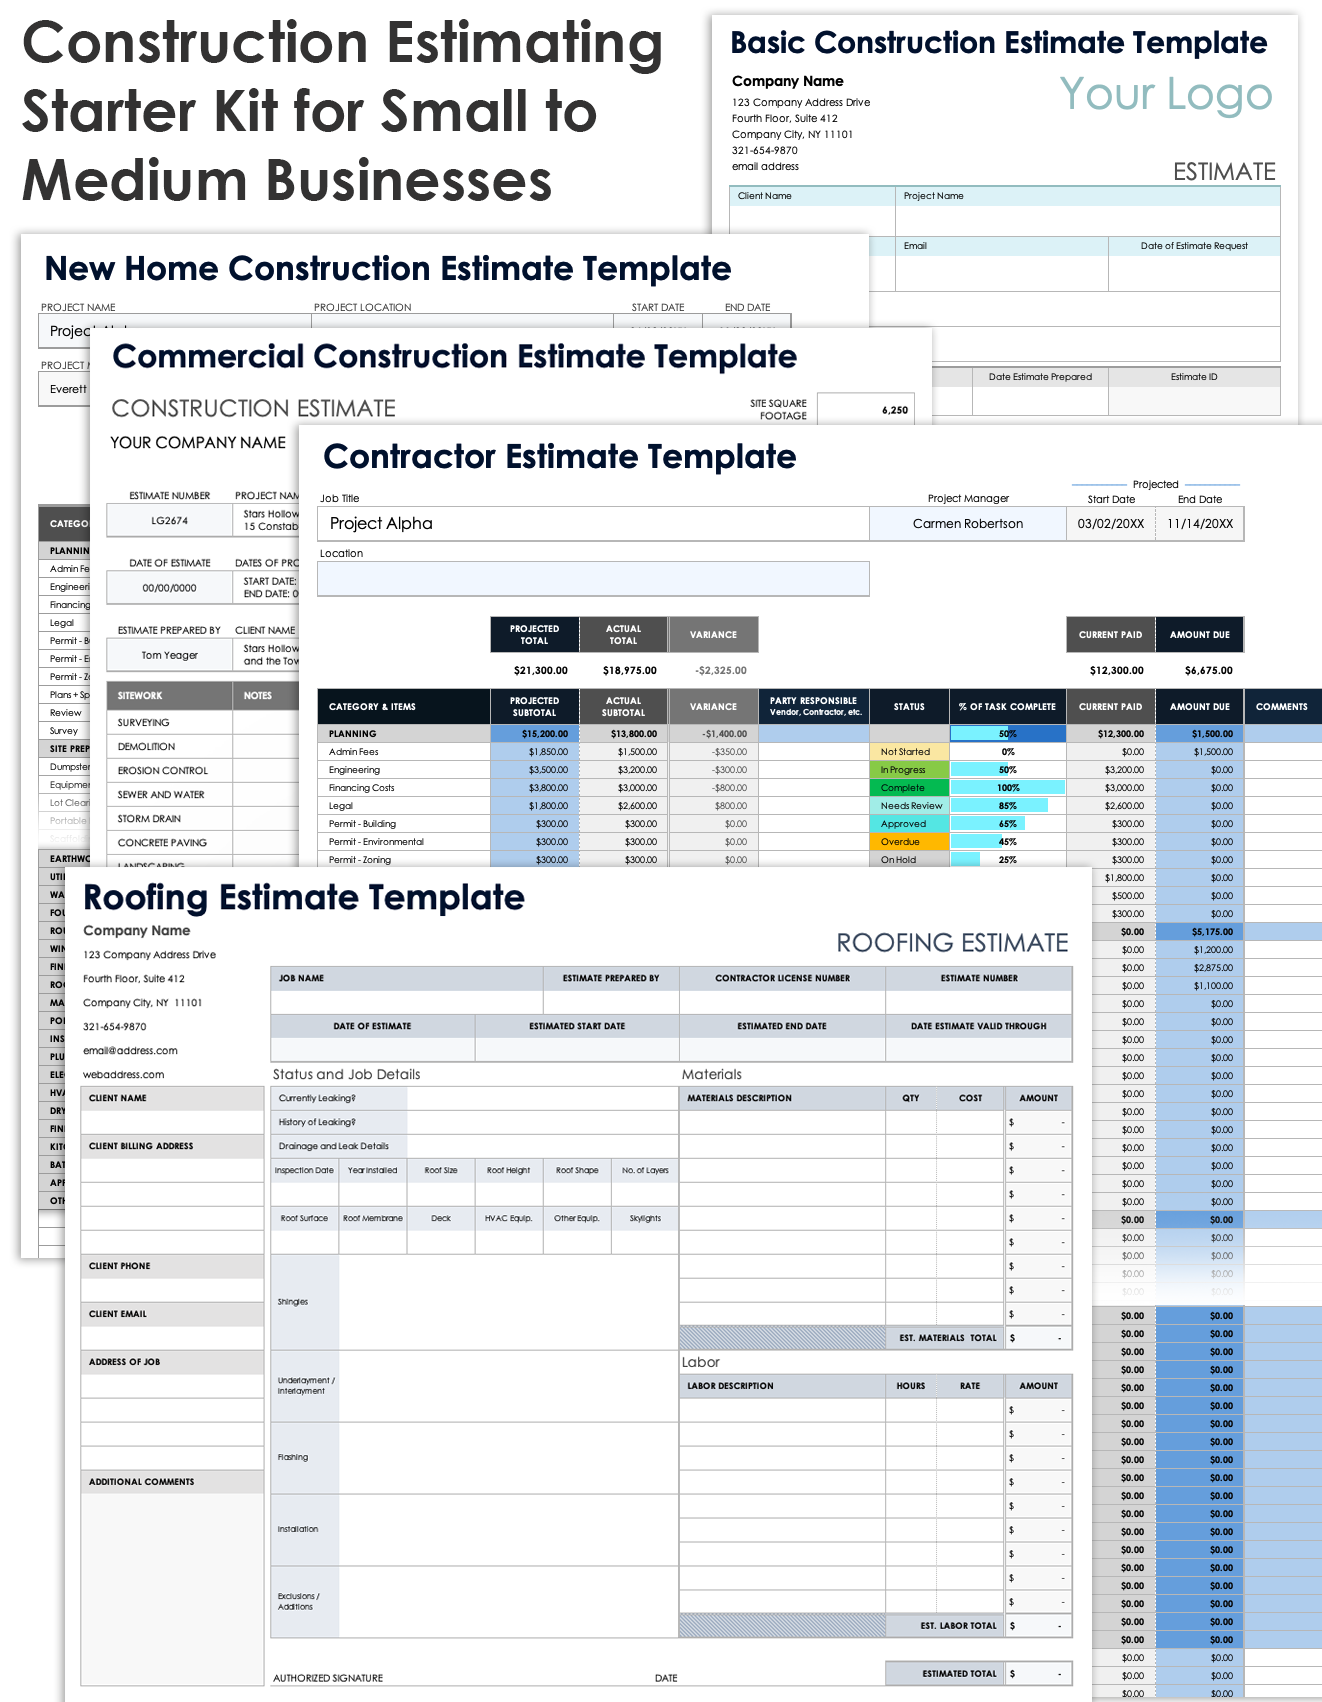
Download the Construction Estimating Starter Kit for Small to Medium Businesses
Use the free, flexible templates in this starter kit to jump-start your construction estimation process. Get the whole starter kit for free in one easy-to-download file.
In this kit, you’ll find the following:
- A basic construction estimator template in Excel to scope a project, list all costs, and give to a client.
- A contractor estimator template in Excel and Microsoft Word to detail your projected costs, and track vendors, task status, and amounts due.
- A roofing estimate template in Excel and Microsoft Word that you can adapt to other fields by changing its wording.
- A new home construction estimate template in Excel , providing a higher level of detail for more complex projects. It also shows markup and gross profit.
- A commercial construction estimate template in Excel , including additional items such as environmental review and engineering.
When planning your budget and finances, you can use various project cost templates to track spending and easily create accurate initial forecasts with these work estimate templates. To manage all aspects of construction, download a variety of Excel construction project management templates.
Factors That Influence Estimating Construction Costs
The biggest factors influencing construction estimates include the project’s complexity, materials, and labor costs — as well as location, which affects both materials and labor costs. Estimators also must account for risks, such as poor weather, site problems, and supply shortages.
Here’s a full rundown of factors that influence construction estimating:
- Project Size and Scope: Bigger, more complex projects cost more because they require more materials, time, and labor. Define a clear project scope at the outset to ensure accurate estimates.
- Location: Where the project is located affects costs. Local labor rates, material availability, transportation, and permits vary by area and can increase expenses.
- Materials: Costs vary based on the type and quality of materials. Some materials are more expensive or harder to find, or they can go up and down in price.
“Break down costs clearly [in your estimate],” Anderson says. “Doing so helps clients understand the value of what they’re paying for and keeps you organized. I learned this when a client questioned my pricing — I realized a clear breakdown prevented misunderstandings.” - Labor Costs: Labor rates change by region and skill level. High demand for skilled labor can drive costs up, as can using unionized workers.
“Calculating labor costs presents the toughest obstacle for newbies,” says Falahee. “Inexperienced workers often undercut their competitors due to their lack of knowledge and, consequently, their inferior skills. High-quality work is obviously based on expertise; hence, never undervalue it.” - Equipment Needs: Equipment rental, fuel, and maintenance add to the budget, especially if the project needs heavy machinery.
- Site Conditions: The condition of the site can add costs. Preparing the land, managing drainage, or handling issues such as poor soil can raise expenses.
Lipman describes how contingency money helps him handle site condition issues. “In Houston, the clay-heavy soil shifts with changes in moisture. Even with a perfect plan, you might discover new cracks or shifts that need extra work. Setting aside 10 to 15 percent of the budget for surprises helps everyone avoid stress.” - Timeline: A tight timeline often costs more because of overtime or rush orders. Delays can also increase costs if the project drags on longer than planned, as you have to pay for the additional labor hours.
- Design Complexity: Custom or complex designs are usually pricier due to specialized materials and skilled labor.
- Market Conditions: Market changes such as material shortages, inflation, or high demand for labor can affect costs. Seasonal factors and weather also play a role.
- Permits and Regulations: Local building codes, safety rules, or environmental laws might add costs for permits or inspections.
- Contingency Funds: Estimators often include a cushion for unexpected costs to cover surprises, especially on complicated projects.
Anderson underscores the importance of adding in this buffer: “The toughest part is planning for the unknown. Estimating isn’t just math — you’ve got to think about what could go wrong. I once underestimated a job because I didn’t account for hidden wood rot, which added extra days of labor and costs. Now, I always include a contingency fund, usually 10 to 15 percent, to cover surprises like that. It’s a small thing, but it saves you a lot of headaches.” - Project Risks: Risks such as weather, price changes, or supply issues can drive up costs. Projects with higher risks often include extra funds to manage any unexpected costs.
“The hardest thing for newcomers is learning to accurately forecast potential risks and their financial impact,” says Heinemann. “It’s easy to underestimate or overlook costs until they arise on-site, especially with labor and material price fluctuations. Early in my career, I struggled with this, but over time, I gained a deeper understanding.”
To help you account for these factors, construction estimates typically include similar sections, which we detail in the next section.
Common Elements in a Construction Estimate
Construction estimates feature different levels of detail, but share common elements. The most basic estimates break down labor and material costs, additional costs such as permits, and a buffer. Failing to consider such items can harm profitability or client trust.
Some types of estimates are only for internal use, such as those that show markups and profit margins.
Here’s a list of the common elements in typical construction estimates:
- Labor Costs: The cost for workers such as carpenters, electricians, plumbers, and other skilled labor needed for the project. Calculate the cost as hourly rate multiplied by hours worked.
- Materials: The cost of all building materials, such as concrete, wood, steel, paint, roofing, and finishing materials. Calculate this cost as unit price multiplied by the number of units.
- Equipment: Costs for renting or buying machinery and tools, including maintenance and fuel.
- Subcontractor Fees: Payments to specialized contractors (e.g., HVAC, plumbing) hired to handle specific project parts.
- Permits and Fees: Local government fees for permits, licenses, and inspections to meet legal requirements.
- Overhead Costs: Indirect costs, such as site office expenses, utilities, and administrative support.
- Insurance and Bonding: Costs for insurance coverage and bonds to protect against potential risks and liabilities.
- Site Preparation: Expenses for preparing the site, such as land clearing, grading, demolition, and setting up utilities.
- Contingency: Additional funds set aside to cover unexpected costs or changes during the project.
- Profit Margin: The contractor’s markup added to the total estimate to ensure profitability.
These elements help form a complete picture of the project’s expected costs, making it easier to plan and budget accurately.
How to Write a Construction Estimate
To write a construction estimate, start with a template. Here are the steps using a flexible contractor’s estimate template
- Download the basic construction estimate template . (The starter kit above also contains this template.)
- Open the template.
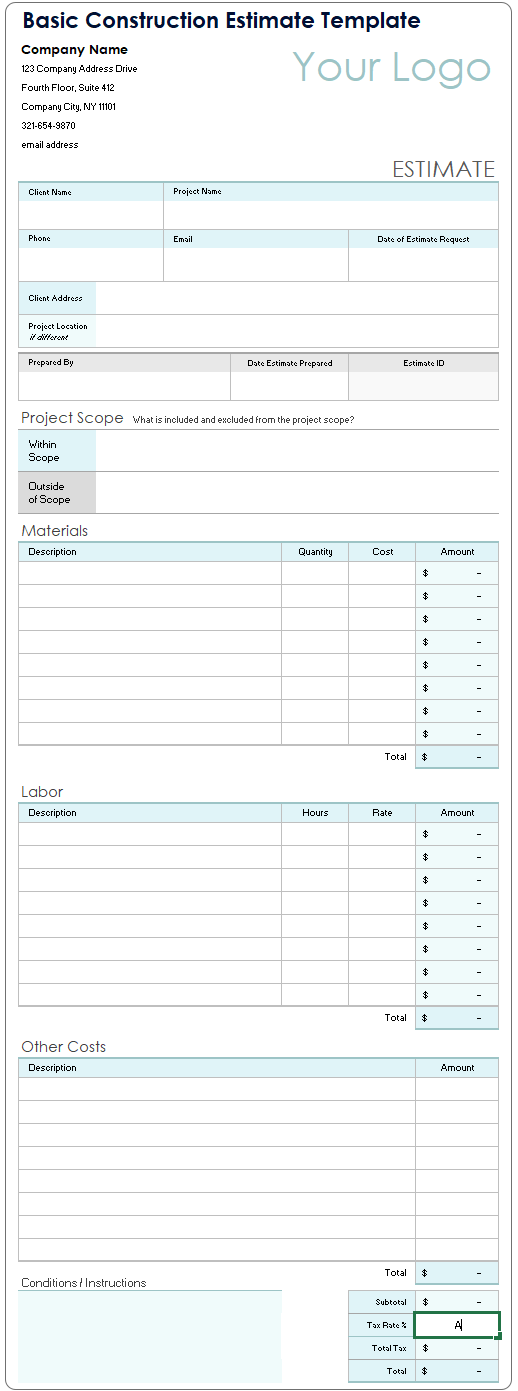
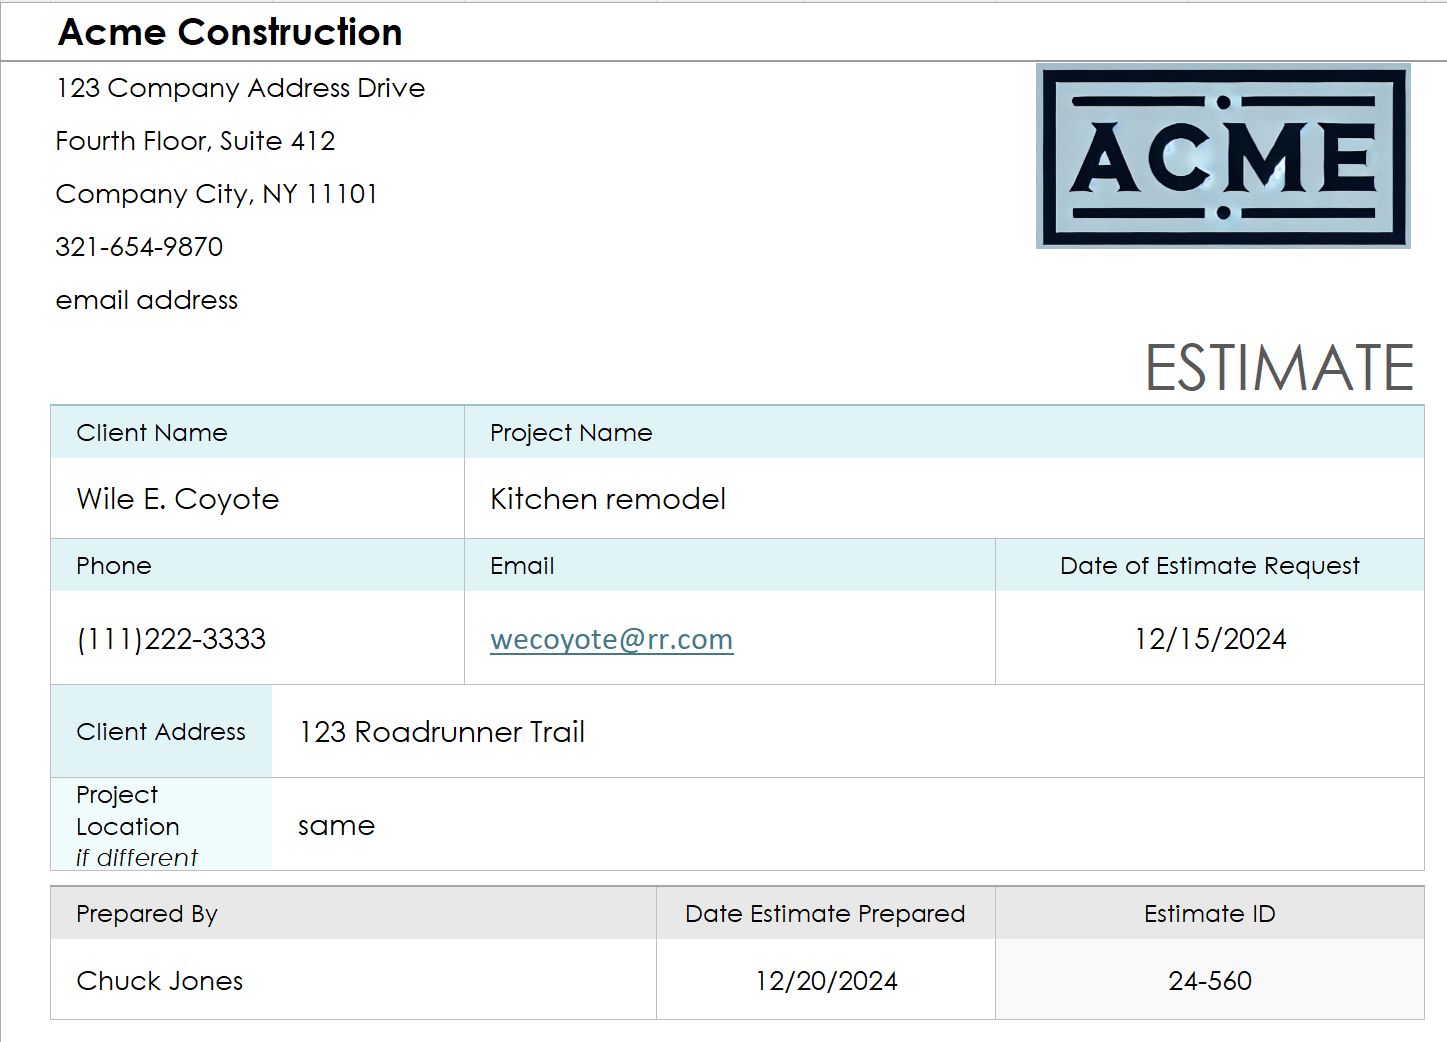
- Add your logo and fill out the info at the top of the form.
- Continue filling out the template by adding any typical costs. Copy the most useful version of your template for ongoing use.
- To estimate a job, fill in the scope and list each line item in its category. The built-in formulas total everything up. See the example below.
- Print to PDF to email the estimate, or print a paper copy. Organize all your invoices in a computer or physical folder for easy reference.
Choose from a variety of customizable construction proposal templates to streamline your bidding process and win new work.
Smartsheet Helps You Manage Construction Cost Estimates and Projects
From pre-construction to project closeout, keep all stakeholders in the loop with real-time collaboration and automated updates so you can make better, more informed decisions, all while landing your projects on time and within budget.
The Smartsheet platform makes it easy to plan, capture, manage, and report on work from anywhere, helping your team be more effective and get more done. Report on key metrics and get real-time visibility into work as it happens with roll-up reports, dashboards, and automated workflows built to keep your team connected and informed.
When teams have clarity into the work getting done, there’s no telling how much more they can accomplish in the same amount of time. Try Smartsheet for free, today.