Building a Roadmap in Excel
A roadmap is a visual tool that helps you articulate the overall goals and objectives of your business to clients, executives, other team members, and more. Since roadmaps use many elements of a spreadsheet, people often build them in Excel.
Roadmaps are comprehensive overviews of a product or project strategy. They should include the product strategy, a release schedule, features, goals, and start and end dates, as well as projected costs. Two main types of roadmaps are available: product roadmaps and project roadmaps.
Product roadmaps give a high-level overview of a product strategy and how it aligns with your greater business goals. The roadmap should show both the strategic and the practical side of a product offering, the reason behind the advancements, and your strategy to implement this roadmap. Your product roadmap should include specific product features and specs, each iteration, and the planned release cycle. For more details on everything a product roadmap should include, visit our helpful article about product roadmap details.
A project roadmap is a strategic outline of a specific project, highlighting key goals and deliverables to achieve through the duration the project. It should include all associated project tasks, milestones, goals, and deliverables. You can use a project roadmap to gain stakeholder buy-in and approval, as well as communicate your overall vision to other team members and executives.
To build an effective roadmap, follow these steps:
- Define Your Strategy: Determine what you want to achieve with this project and how you’ll measure success.
- Gather Requirements: Identify all the resources and materials necessary to successfully implement the project.
- Identify a Timeline: As with any project, you’ll need a projected timeline with clear start and end dates. Make sure all associated project tasks have clear dates.
- Loop in Stakeholders for Feedback: Gain approval by sharing your roadmap with all key stakeholders and getting their feedback on such details as timelines, costs, and resources.
- Share Your Roadmap with Stakeholders: Once your group has approved and finalized the roadmap, share it among all stakeholders and team members so that everyone can stay in the loop as your project progresses.
How to Create a Roadmap in Excel
Download Roadmap Template - Microsoft Excel
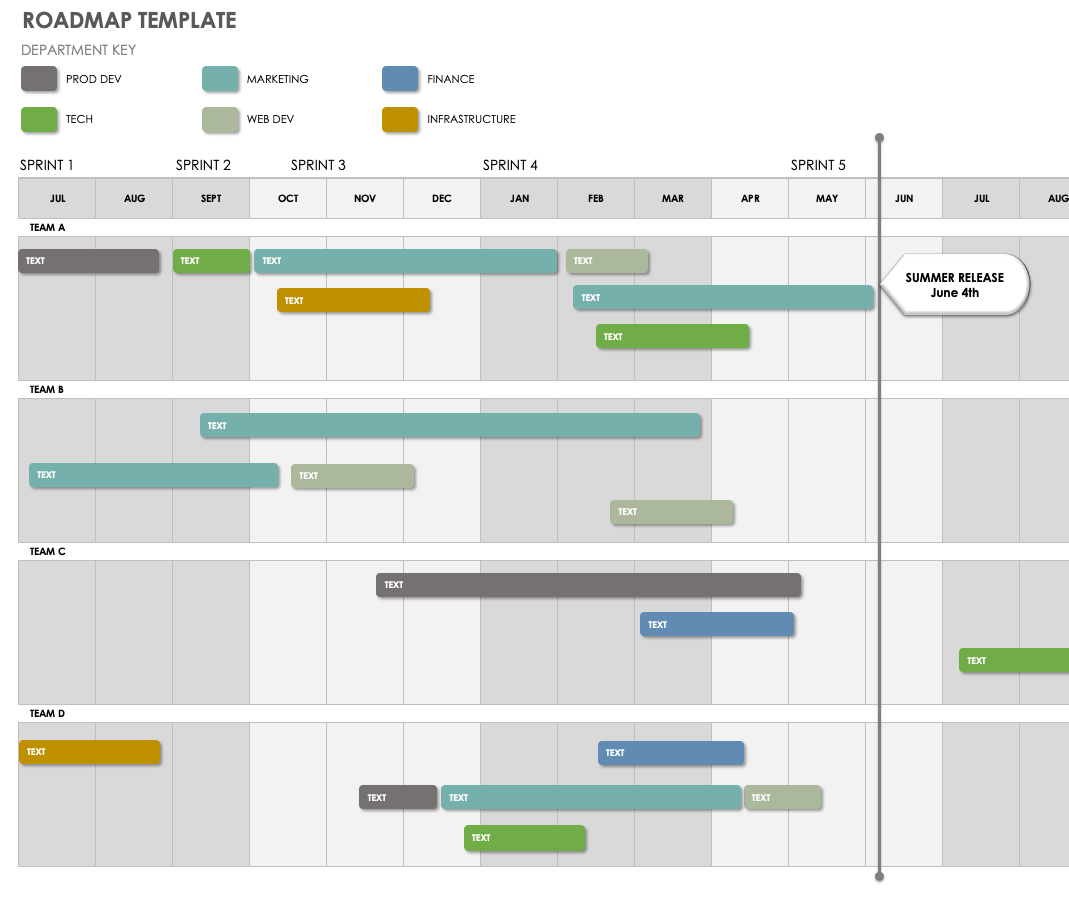
Using a template is a helpful and easy way to create an effective roadmap in Excel. This roadmap template is free to download and fully customizable in Microsoft Excel. Download the template and follow the steps below to build a basic roadmap in Excel.
For a step-by-step tutorial on how to create the best roadmap in Excel, watch this short video that walks you through the steps as they're listed below.
Open the Microsoft Excel Project Roadmap Template
Download the template above, which will automatically open the template in a new Excel sheet.
Adjust Dates for the Project Roadmap
To make this the most effective roadmap, you’ll want to break out your timeline by dates to help you accurately plot your tasks along your roadmap. To adjust the dates in the roadmap, follow these steps.
- Double click on any of the cells at the top of the sheet that signify specific quarters.
- Type in the quarter as it applies to your project.
Add Task Names
After you add the project dates, you can start inputting specific tasks on the roadmap. Follow the steps below to add task names to your roadmap.
- Double-click within the task cells.
- Type in each task name.
Add and Move Subtasks
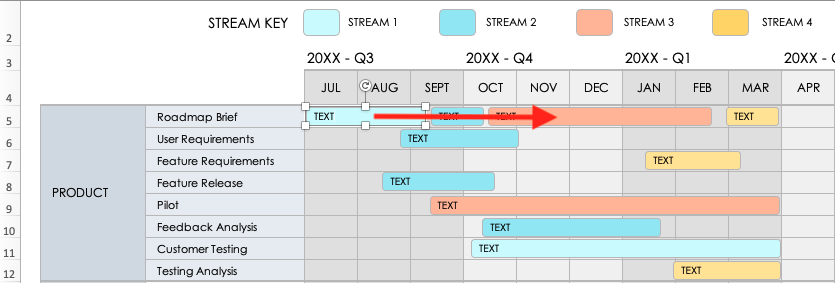
Once you enter your tasks, subtasks, and dates on your roadmap, you can start to move and adjust your subtask bars according to their start and end dates. This step provides a visual overview of a roadmap from start to finish.
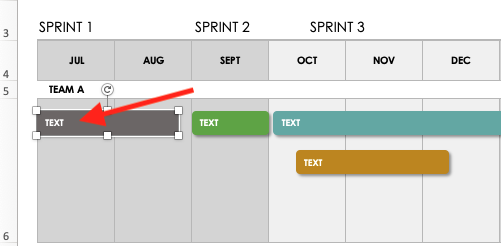
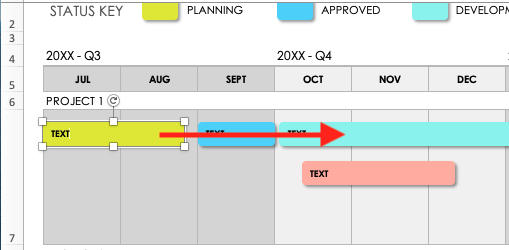
- Double-click within any of the subtask bars in the template.
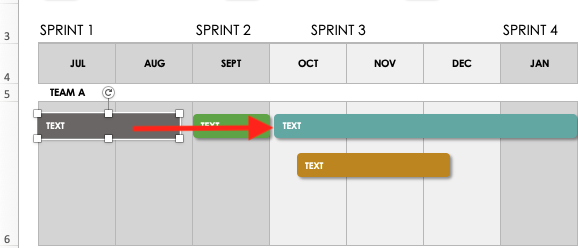
- Click on a task bar and drag it across the template so that it fits within a specific date range.
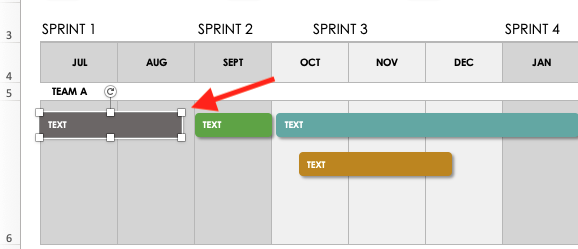
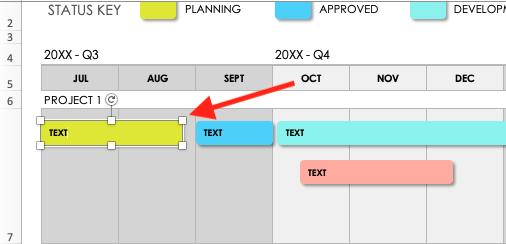
- To lengthen or shorten the task bars, click and grab any corner of the task bar and drag it further away or closer to the other end of the task bar.
Change Color of Subtask Bars
Create a color code to organize subtasks and see who should be working on what assignment or which subtask is part of which task. To change the color of your subtask bars, follow these steps:
- Click on any subtask bar.
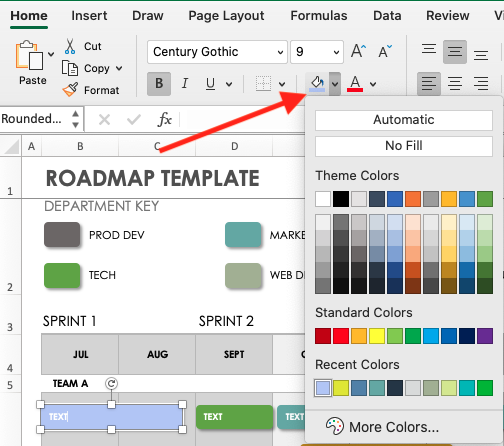
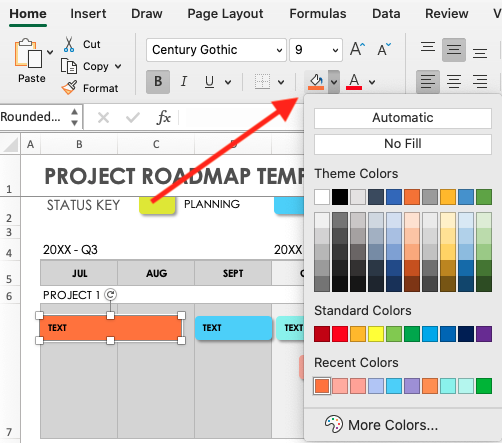
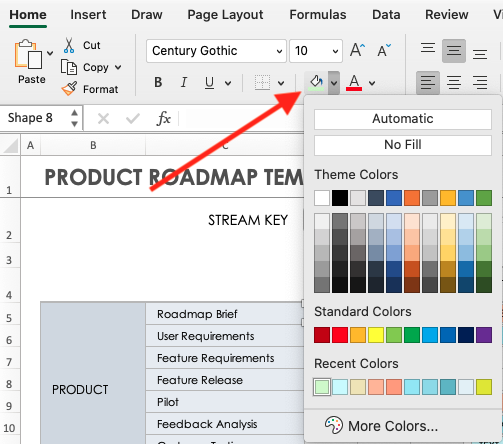
- At the top navigation bar, click the paint bucket icon and click a color. This action will automatically change the color of the entire subtask bar.
Create a Legend or Status Key for the Roadmap
At the top of a template, you’ll find a department key. Update the department bar to quickly identify tasks assigned to specific teams or departments by changing the bar names and colors.
- Double-click on any of the existing department key titles and rename it to fit your project.
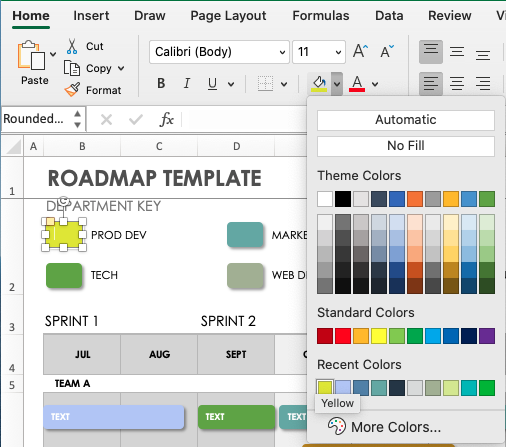
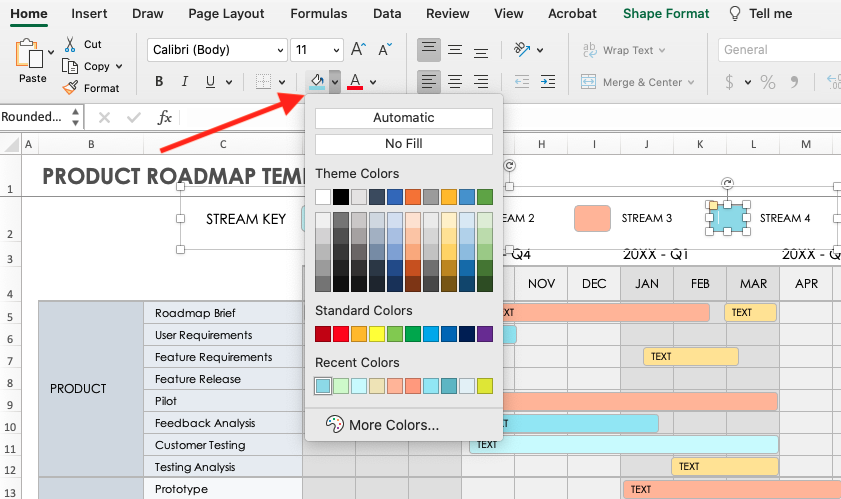
- To change the color of an existing department key box, double-click on the key box and click the paint bucket icon in the top navigation bar. Click on the color you want for the department key box.
How to Create a Project Roadmap in Excel
Download Project Roadmap Template - Microsoft Excel
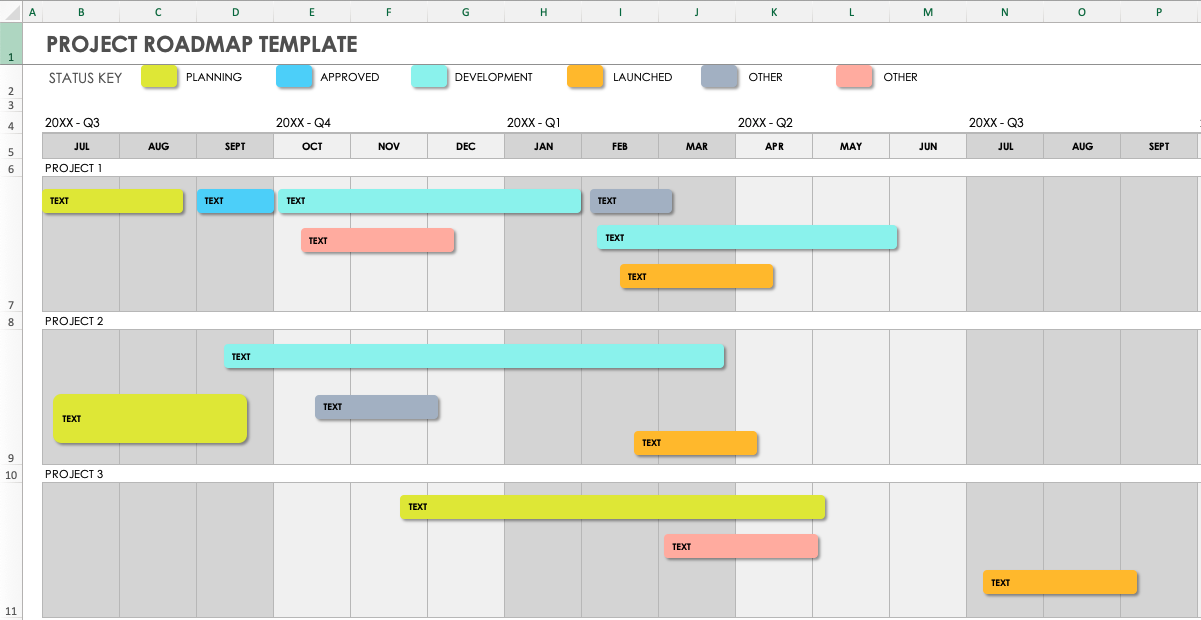
To create a project roadmap in Excel, use this downloadable template. Then follow the steps below to ensure you’re including all necessary details within your roadmap and customizing it to fit your project’s needs.
For additional project roadmap templates, visit this article for a wide variety of roadmap use cases, examples, and templates.
Open the Microsoft Excel Project Roadmap Template
Click on the link to download the project roadmap template above. This action will download the template and open it in a new Excel sheet.
Add a Project Title
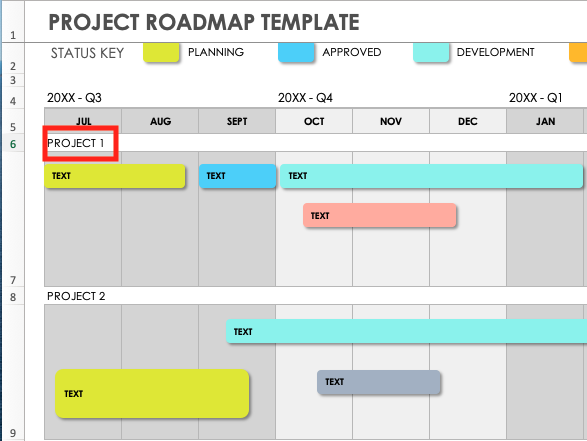
- Double-click on the title at the top of the template and delete the existing name.
- Type the name of your project in the text box.
Adjust Quarters and Dates for the Project Roadmap
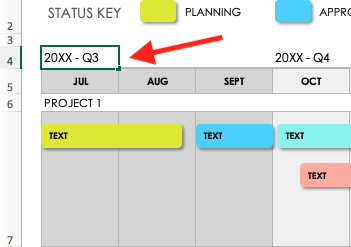
- Double-click on a cell that signifies specific quarters at the top of the sheet.
- Edit the text in the quarter as it applies to your project.
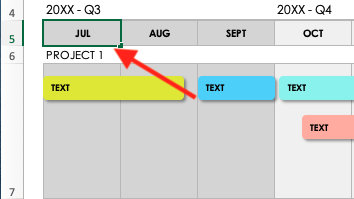
- Double-click on any cell signifying specific months.
- Edit the text in the months as it applies to your project.
Add Task Names to the Project Roadmap
Input specific tasks on your roadmap. Follow the steps below to add task names to the roadmap.
- Double-click within the task cells and type each task name.
- Repeat for each project task.
Add and Move Subtasks
After you add tasks, dates, and subtasks to the roadmap, you can move and adjust the subtask bars according to start and end dates. This step provides a visual overview of a roadmap from start to finish.
- Double-click in any of the subtask bars in the template and name them to fit your project.
- Click on and drag task bars to move them on the template so that they fit within a specific date range.
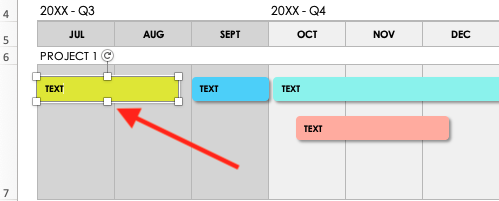
- To lengthen or shorten the task bars, click and grab any corner of the task bar and drag it further away or closer to the other end of the task bar.
Change the Color of Subtask Bars
Create and add a color code to organize subtasks and easily identify who should be working on what assignment or which subtask is part of a particular task. To change the color of your subtask bars, follow these steps.
- Click on a subtask bar.
- At the top navigation bar, click the paint bucket icon and click the color you want. This action will automatically change the color of the entire subtask bar.
Create a Legend or Status Key
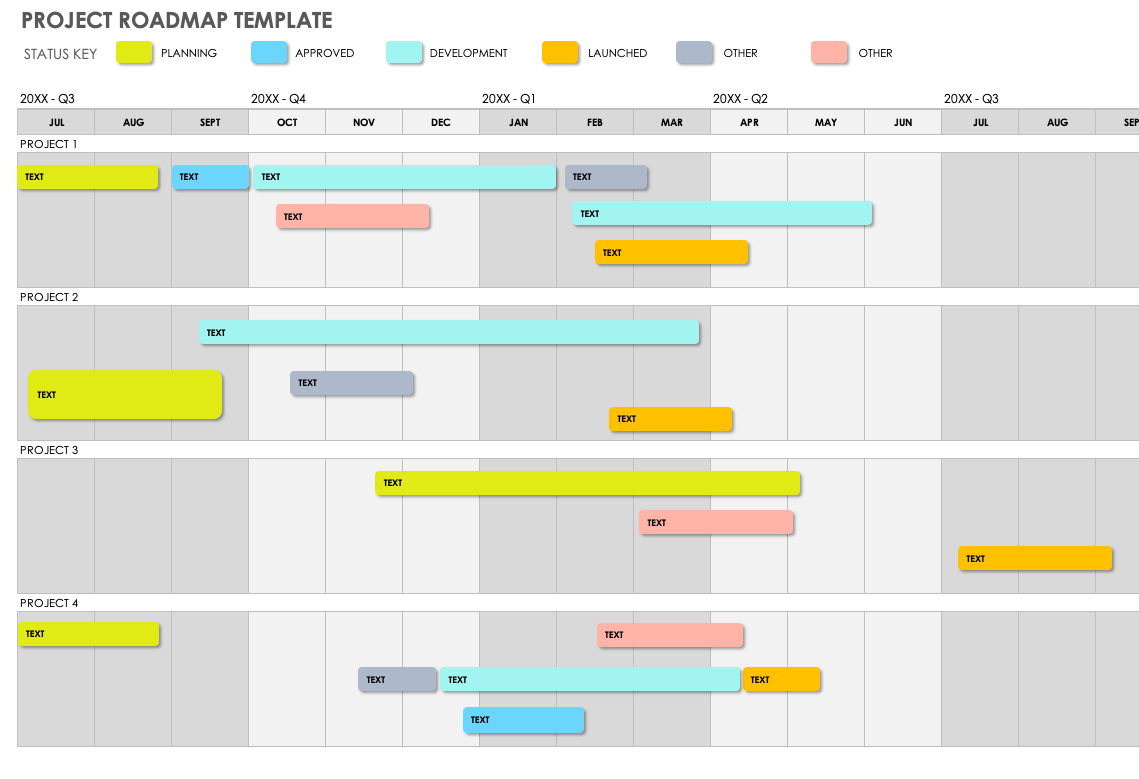
Update the status key bar at the top of the template to fit the needs of your project so you can quickly identify tasks in each phase by changing the names and colors of the bars.
- Double-click on an existing status key title and rename it to fit your project.
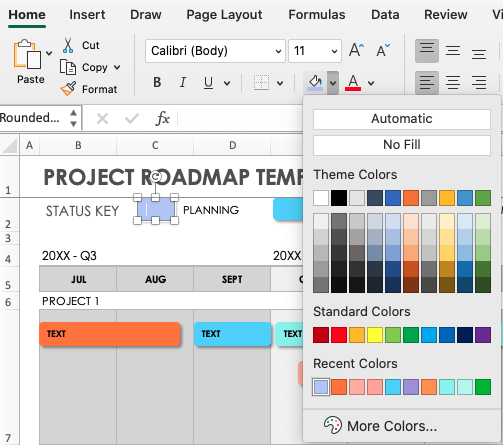
- To change the color of an existing status key box, double-click on the status key box and click the paint bucket icon in the top navigation bar. Click on the color you want.
How to Create a Product Roadmap in Excel
Download Product Roadmap Template - Microsoft Excel
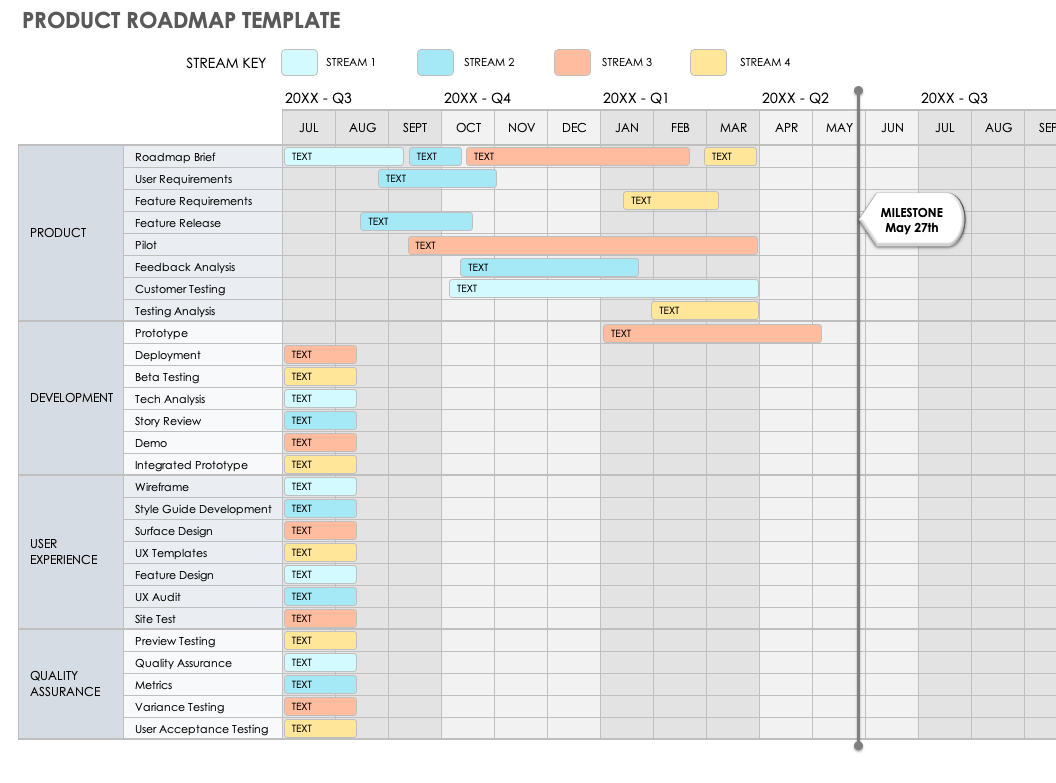
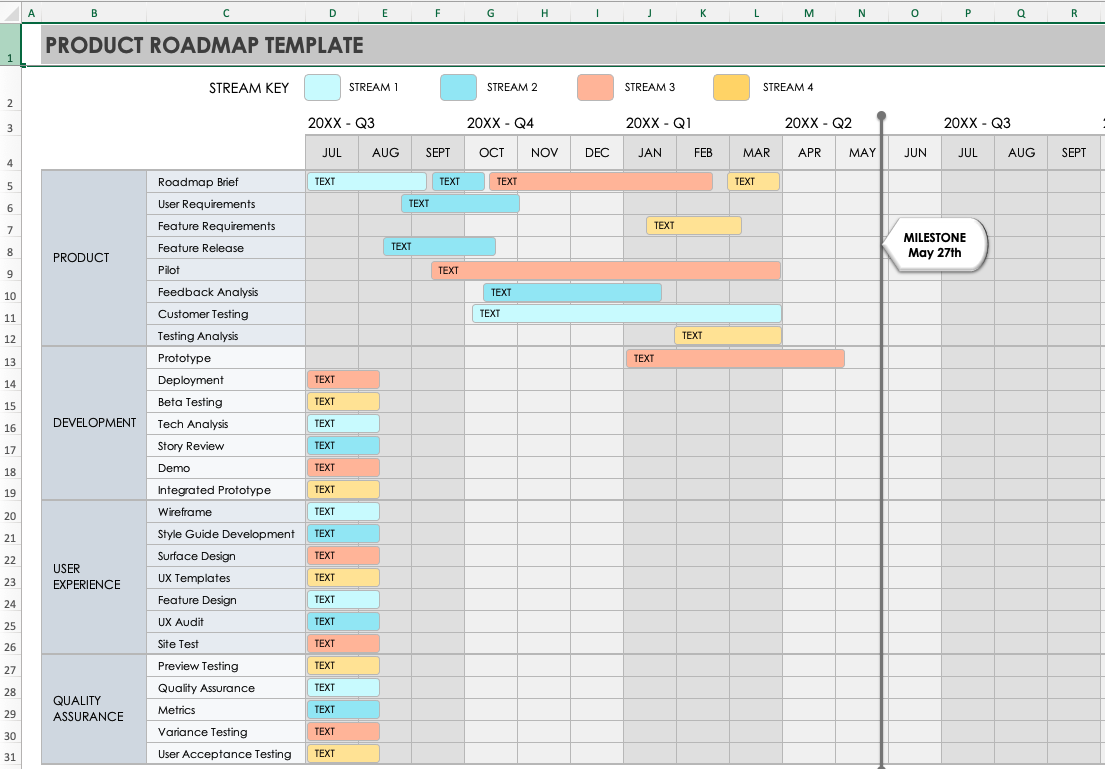
To create a product roadmap in Excel, use this helpful, downloadable template to get started. Follow the steps below to customize the template to fit your product strategy needs. Include all proper details to ensure you create and release your product in a timely fashion.
For additional product roadmap templates, visit our article for a comprehensive list of roadmap templates for product launches, releases, and more.
Open the Microsoft Excel Product Roadmap Template
Click on the link to download the template. This action will open the template in a new Excel sheet.
Add a Project Title
- Double-click on the title at the top of the template to highlight the text.
- Type the name of your project in the text box.
Adjust Quarters and Dates for the Project Roadmap
To make this the most effective roadmap, break out your timeline by dates and quarters to help you accurately plot tasks along the roadmap. To adjust the quarters and dates in the roadmap, follow these steps:
- Double-click on any cell that signifies specific quarters at the top of the template.
- Type the quarter as it applies to your project.
- Double-click on any cell that signifies specific months at the top of the sheet.
- Type in the months as it applies to your project.
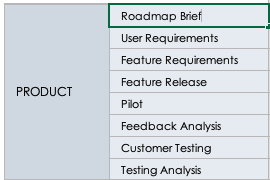
Add Task Names
After you add project dates, you can start inputting specific tasks on the product roadmap. Follow the steps below to add task names to your roadmap.
- Double-click within the task cells.
- Type each task name.
Add Work Streams
Now that you have the dates and the tasks involved in your project, you can add specific work streams to your roadmap. Work streams are tasks associated with different phases of the roadmap that may happen concurrently in order to get more done faster. Follow the steps below to add work streams to your roadmap.
- Double-click within the work stream bar in the roadmap.
- Type the title of each workstream.
Adjust Work Streams on the Excel Product Roadmap
Adjust your work stream bars according to their start and end dates for a visual overview of your roadmap from start to finish. Here are the steps to follow:
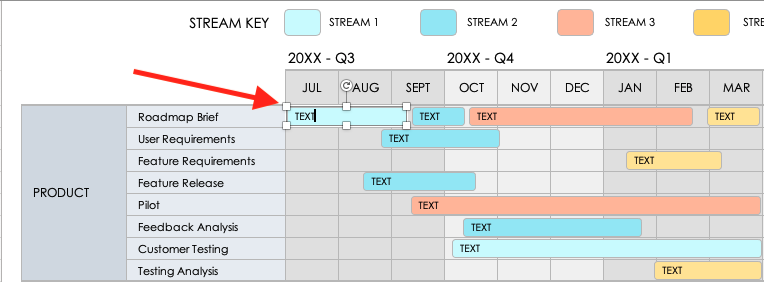
- Click on and drag the work stream bars to move them on the template, so it fits within a specific date range.
- Click and drag any corner of the work stream bar and drag it to extend or shorten its duration.
Change the Color of Work Stream Bars
Create a color code to easily organize work streams and identify who should be working on what assignment or which work stream is part of which phase of the product roadmap. To change the color of your work stream bars, follow these steps:
- Click on a subtask bar.
- Click the paint bucket icon on the top navigation and click a color. This action automatically changes the subtask bar color.
Create a Legend or Status Key for the Product Roadmap
Update the status key bar at the top of the template to fit your project needs. This step helps you quickly identify tasks in each phase by changing the names and colors of the bars.
- Double-click on an existing status key title and rename it to fit the needs of your project.
- To change the color of an existing status key box, double-click on the status key box and click the paint bucket icon in the top navigation bar. Click on a color.
For additional best practice tips and tricks, visit our article for guidance on how to create the most effective product roadmap.
Roadmap Templates in Microsoft Excel
To get you up and running faster, you can download a free, preformatted Microsoft template for a specific use case. Below, you’ll find a variety of helpful templates for creating and managing a roadmap.
Technology Roadmap Template
Download Technology Roadmap Template - Microsoft Excel
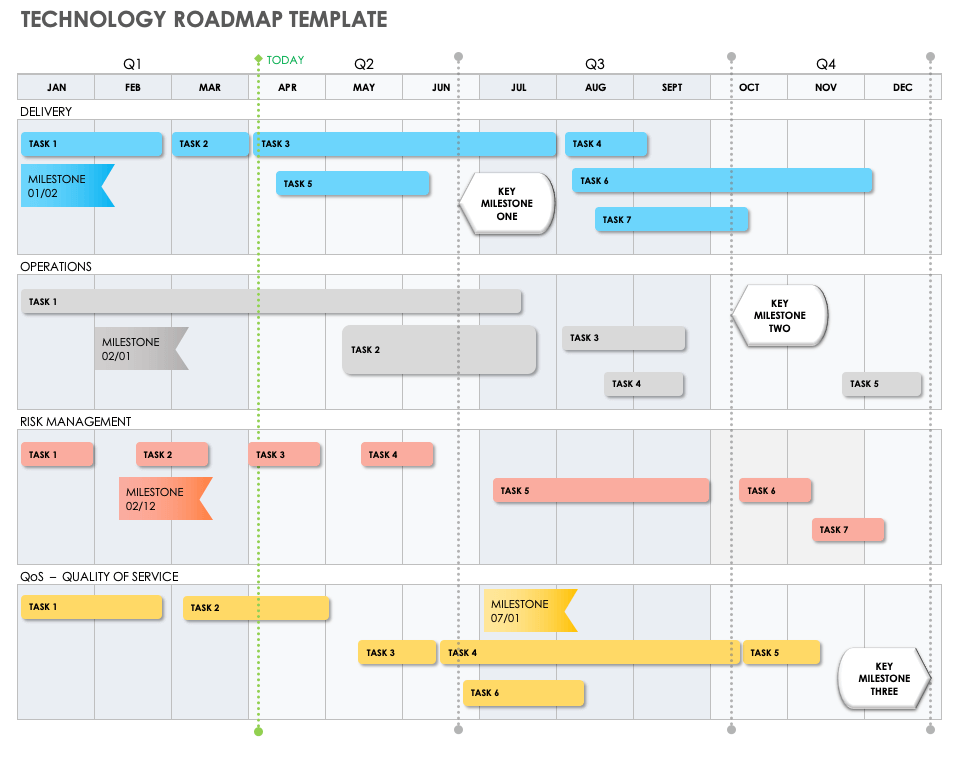
Use this template to document technology infrastructure projects and initiatives. This template breaks down the roadmap by both quarters and months, allowing you to plot project milestones, phases, and delivery dates.
IT Roadmap Template
Download IT Roadmap Template - Microsoft Excel
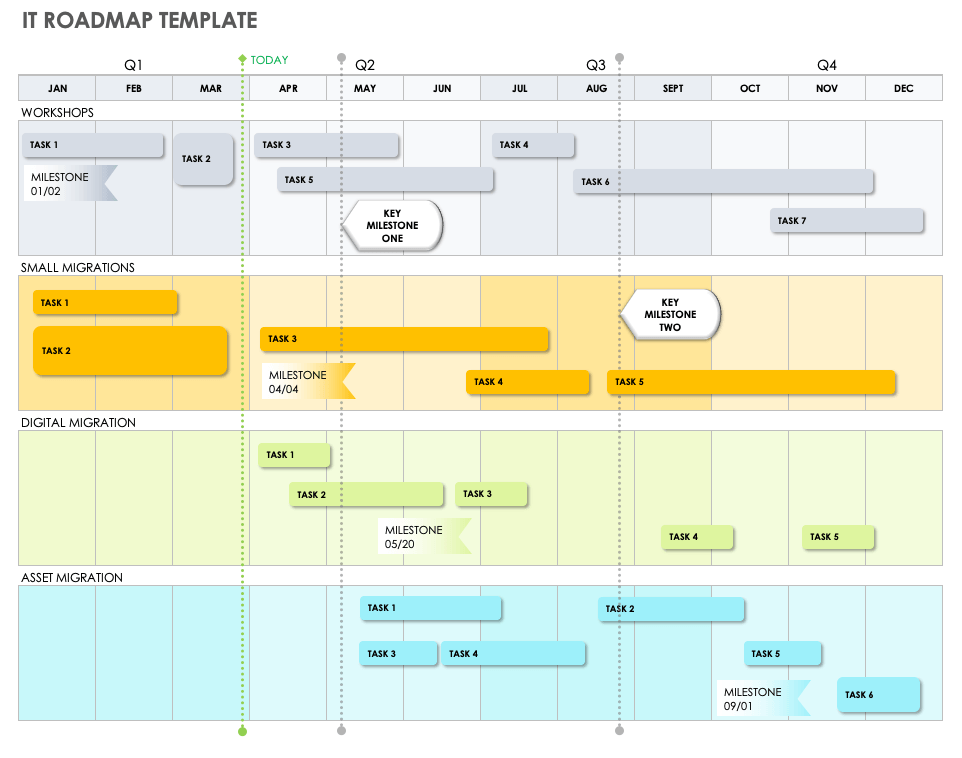
This IT roadmap template provides an easy way to plan and track project tasks associated with an IT initiative, such as app upgrades or product launches. You’ll find space to add key details such as milestones, start and end dates via expandable task bars, and go-live dates, so you can accurately plan, track, and share your IT roadmap with all necessary stakeholders.
Strategic Operations Roadmap Template
Download Strategic Operations Roadmap Template
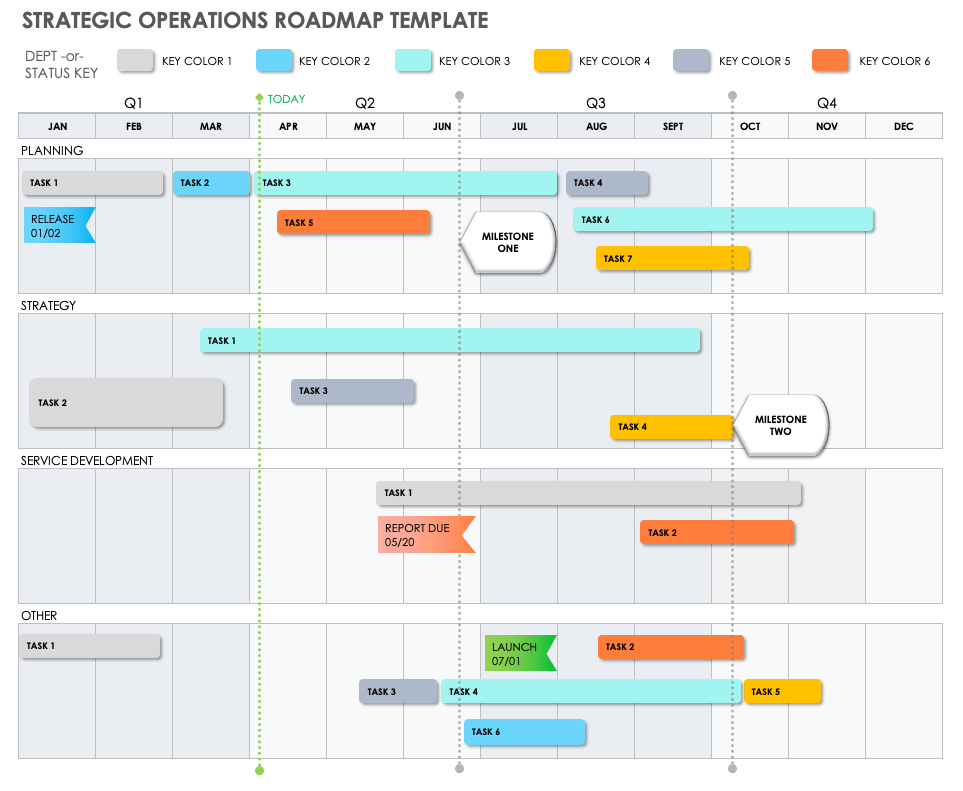
Create a visual overview of the key milestones that make up your strategic operations plans with this downloadable template. Use the template to present your initiatives and projects, thereby providing a true vision of your growing business. This template includes space to track key milestones and quarterly reviews, as well as the individual tasks that comprise all your operations.
For even more roadmap templates that you can use across a variety of use cases, visit our article with a comprehensive list of roadmap templates.
Why Excel Is Not the Best Option for Creating Roadmaps
Although Excel is a familiar spreadsheet tool, it may not be the best tool for creating a collaborative, real-time roadmap that you can update, review, and share with stakeholders and team members.
Here are some other reasons why Microsoft Excel shouldn’t be your tool of choice when creating roadmaps:
- Hard to Change Views: Roadmaps need to be adjustable so that you can highlight different parts of your project or show a high-level overview. Excel doesn’t offer these adaptable views. Instead, all views are generally the same, and they include fixed columns and rows. In order to create separate views, you must create new tabs that highlight different levels of detail, which isn’t realistic when you’re trying to be agile.
- Not Collaborative: Although you can email Excel files among team members and stakeholders, the program isn’t conducive to real-time visibility and feedback. There’s no way to leave comments directly in the file that others can easily view, limiting the amount of collaboration that can occur within the roadmap.
- Persistent Version Control Issues: Since two people can’t work on an Excel spreadsheet together, it’s hard to track and identify which file is the most up-to-date version. This confusion can lead to some people working with outdated information, ultimately delaying a project’s timeline or product’s development.
Construct Powerful Roadmaps with Smartsheet
Timeline view in Smartsheet empowers users to plan, visualize, and collaborate on date-based work in real-time, enabling you to effortlessly organize tasks, track progress, and communicate status.
In just a few clicks, launch your project’s timeline on any sheet to visualize your work, understand the details, and adjust information, making it easy to track project progress, detect blockers, and communicate statuses.
Discover how timeline view in Smartsheet can help your team visualize date-based work and achieve greater efficiency and transparency across projects.
Learn more about timeline view in Smartsheet.
