How to Make a Timeline in PowerPoint
To make a timeline in PowerPoint, create a new presentation and choose a theme that supports graphics. Next, use the SmartArt tool to select a workflow style to show the steps in the timeline.
Use this step-by-step guide to build a simple timeline that shows task and workflow sequences:
- Open PowerPoint and click Blank Presentation to create a new presentation.

- Click the Home tab > New Slide. Click Title and Content to create a presentation with this theme.

- Six icons will appear in the black presentation. Click the upper-center icon for Insert a SmartArt Graphic.
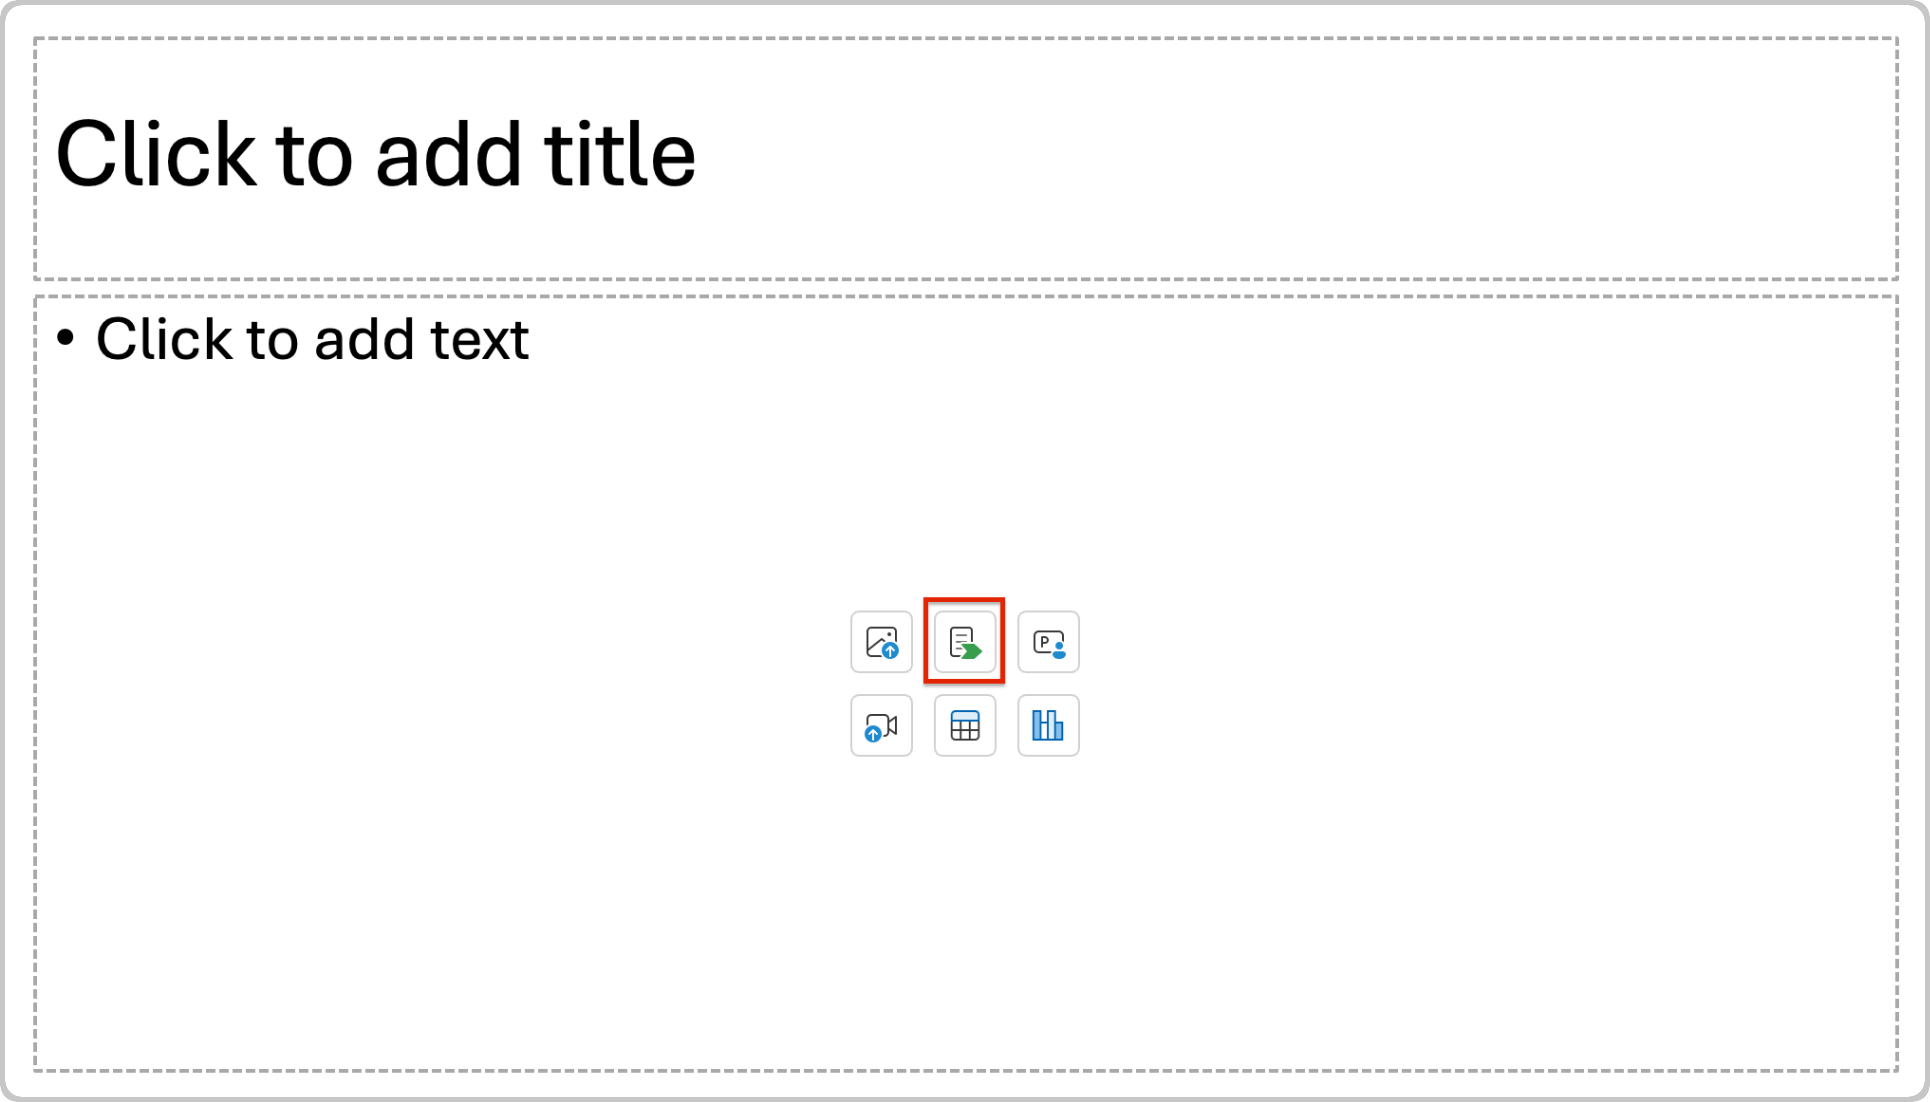
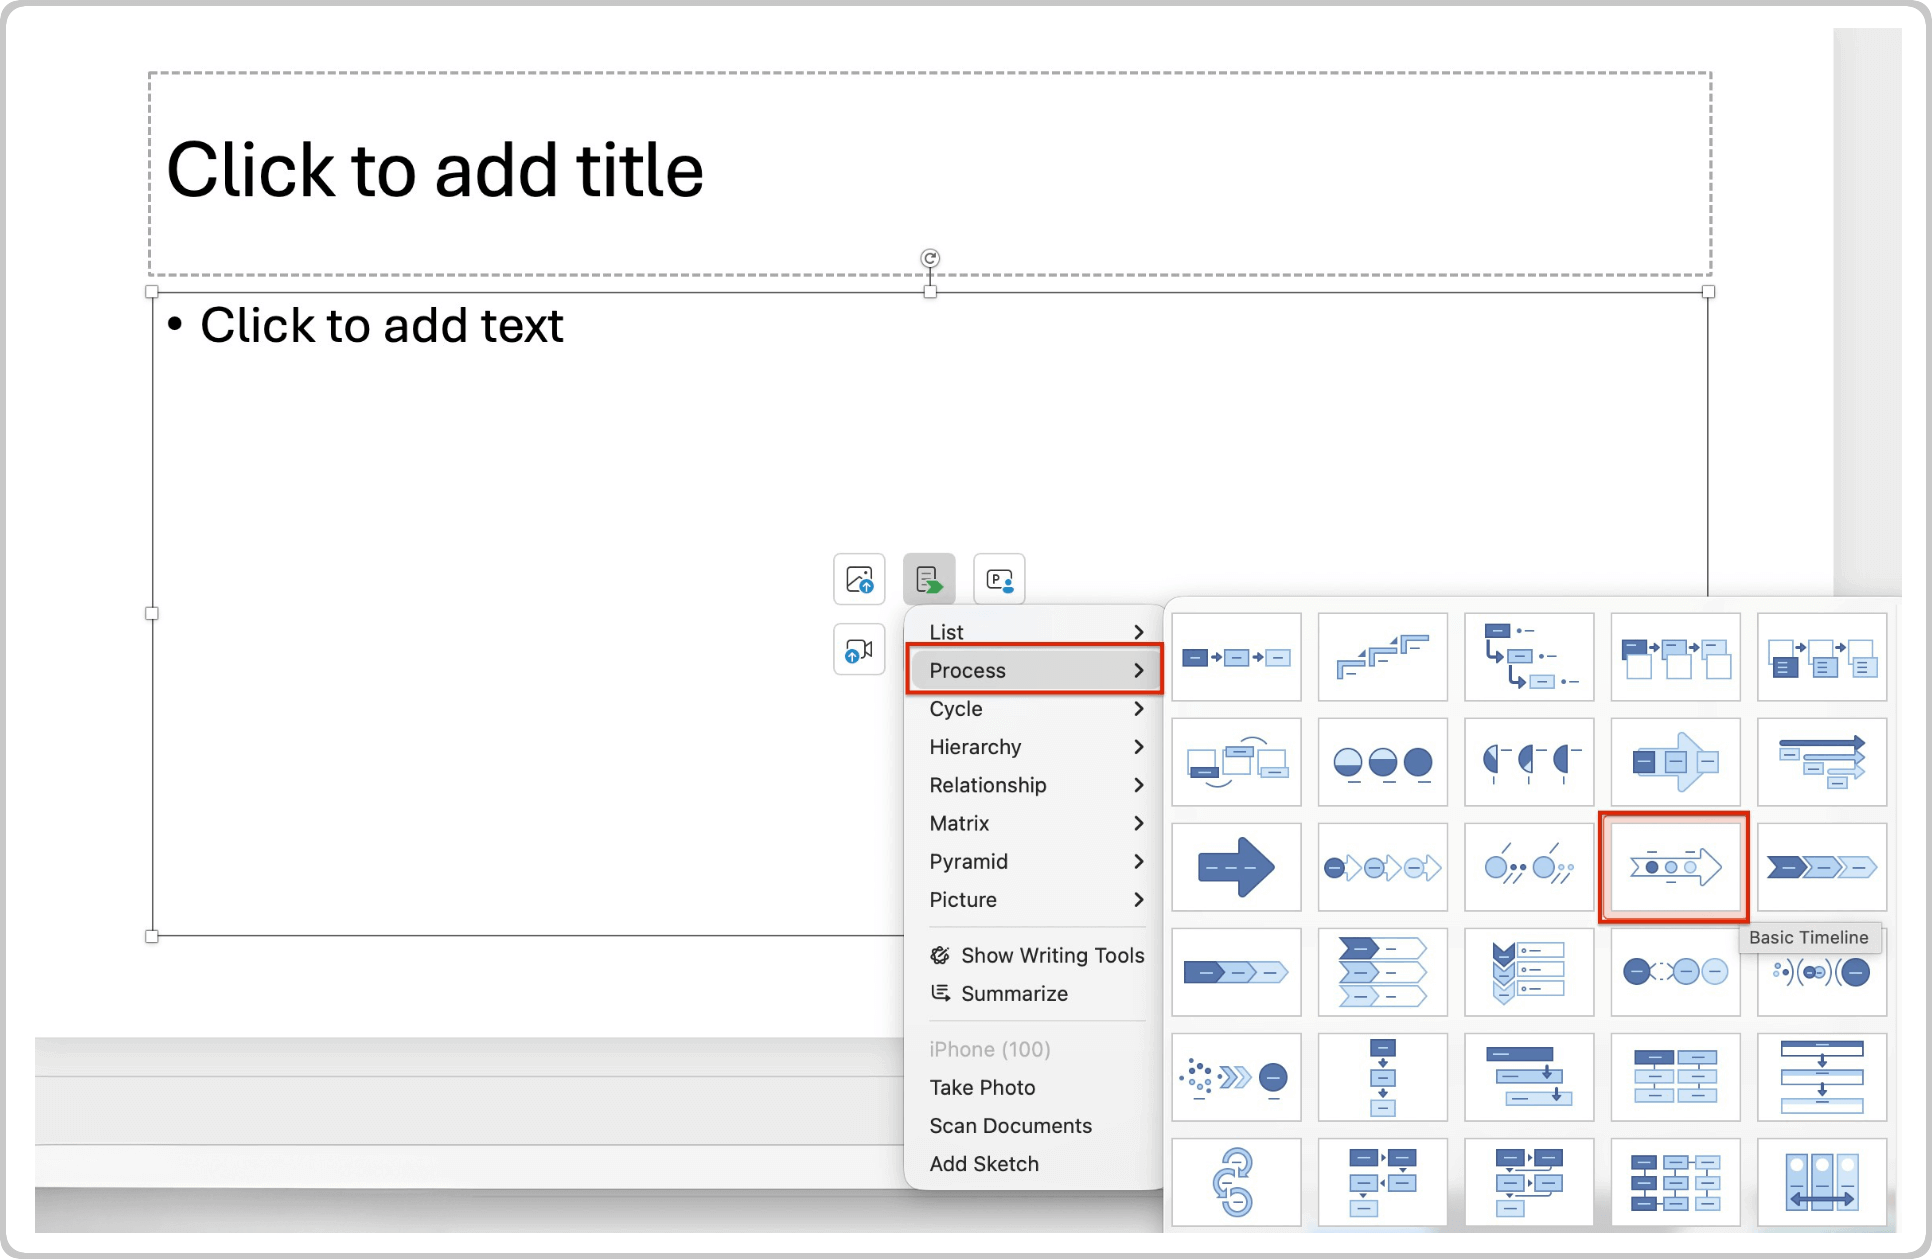
- Click Process in the pop-up box. Click Basic Timeline > OK.
Add Your Project Information to the PowerPoint Timeline
To add project information to a PowerPoint timeline, enter dates and tasks directly on the slide or add a text box for more space. Use keyboard functions to adjust and add items as needed. Follow this step-by-step guide to enter your timeline details:
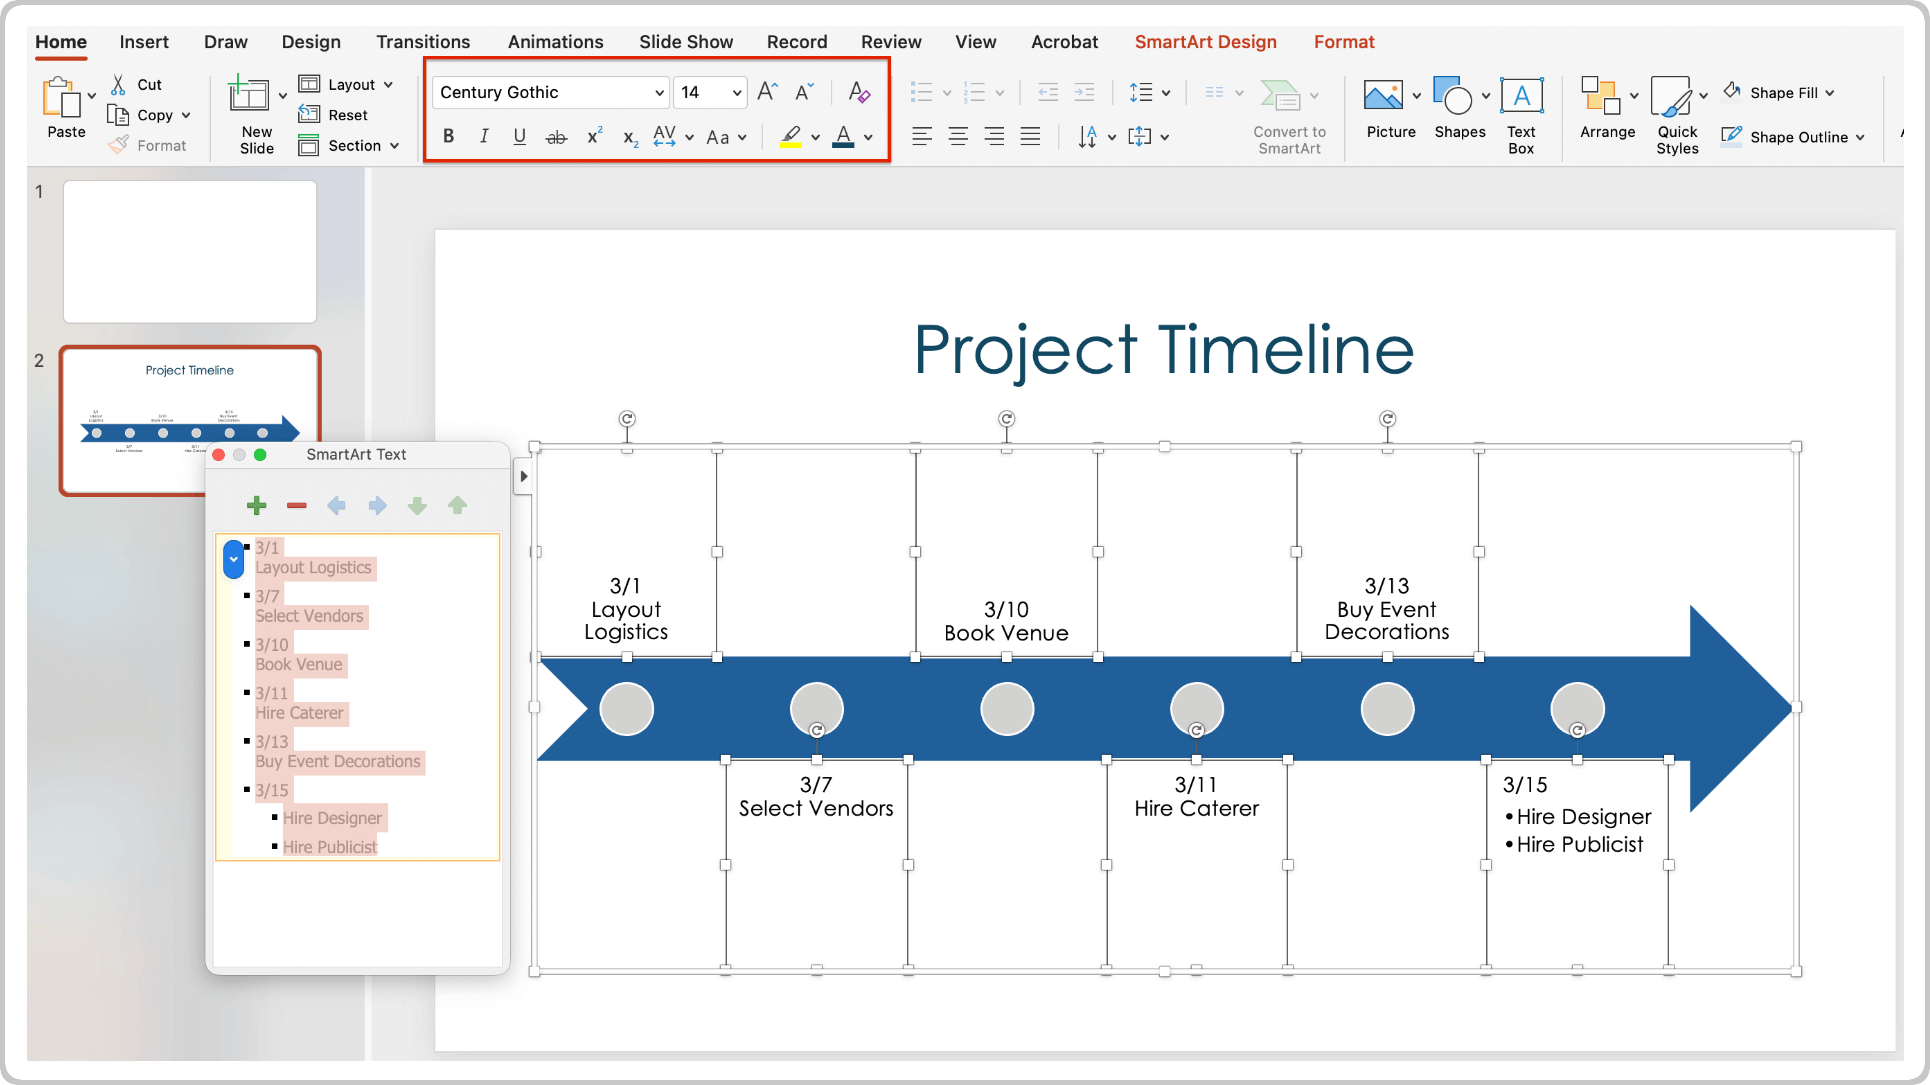
- Click on [Text] in the slide or use the Type your text here box to add dates and project tasks to the timeline.
- Press Enter after the date in the slide to move text under the dates.
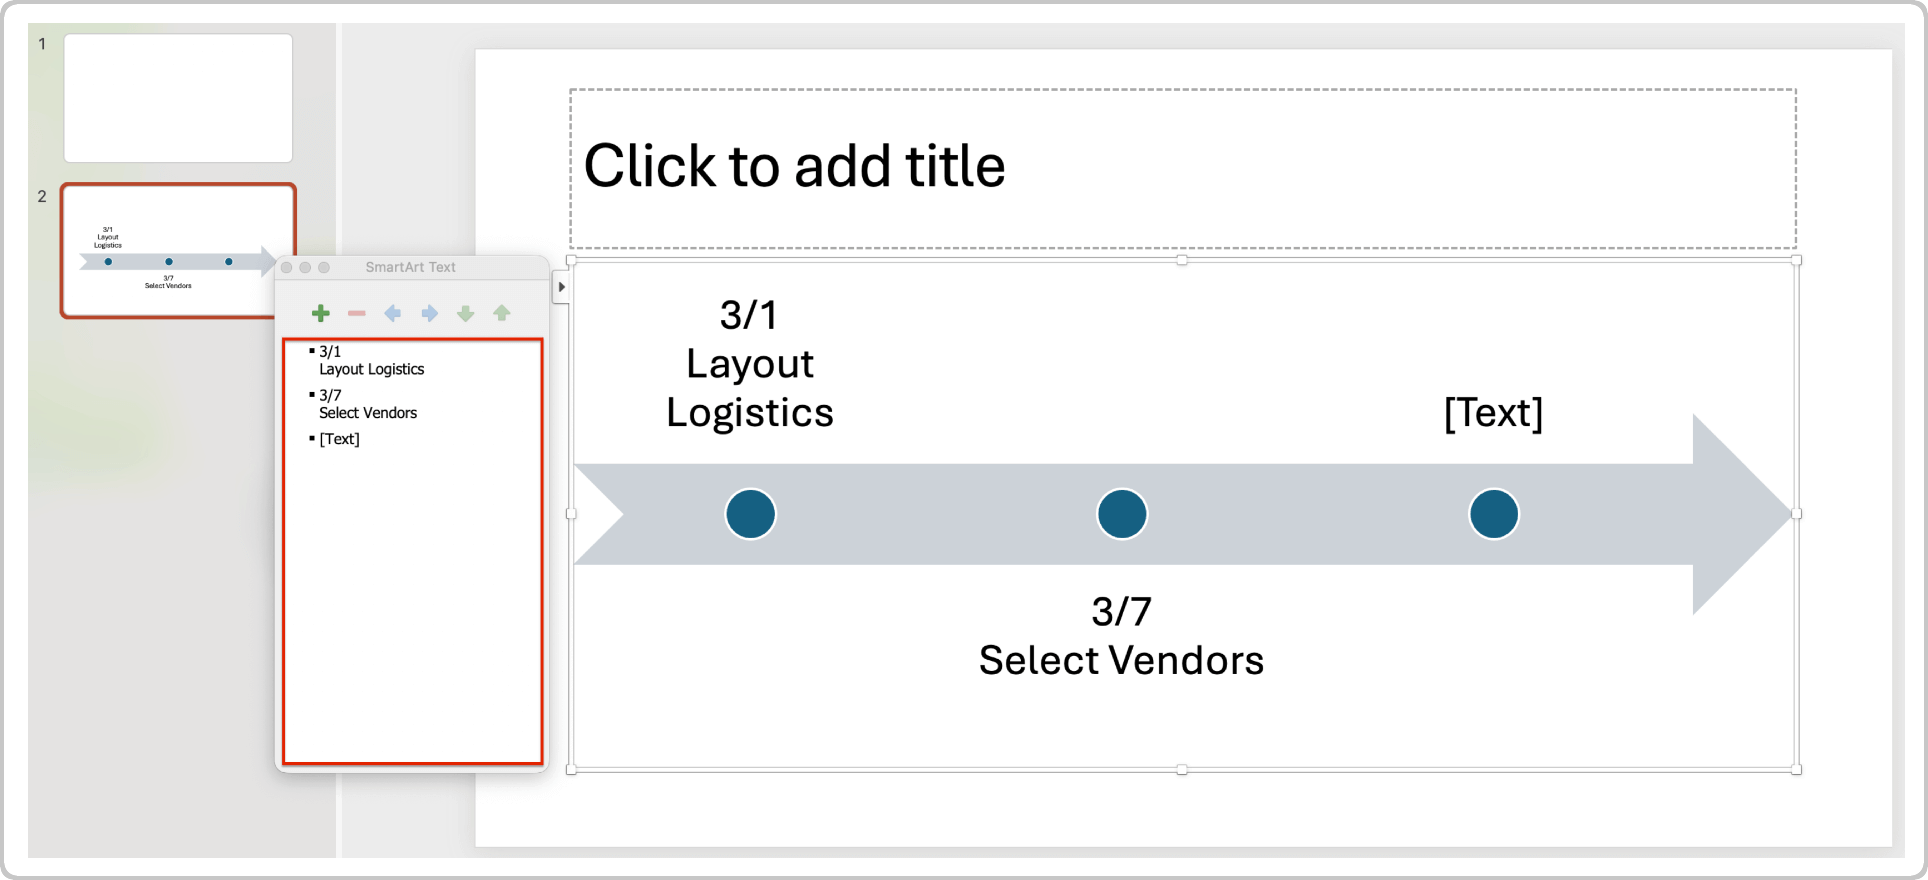
- Press Enter after each bullet point in the text box to add dates and tasks to the timeline.
- To enter multiple tasks on the same date, enter the date in the text box, press Enter, and then press Tab. Continue pressing Tab to add more tasks on the same date.

- Click and highlight the text in the slide and press Delete to delete a task.
Customize the Look and Feel of a Timeline in PowerPoint
To customize the look and feel of your PowerPoint timeline, add a title and adjust the text style. Change colors, shapes, and fonts to match your brand or timeline theme.
Follow these steps to personalize your timeline and make it stand out:
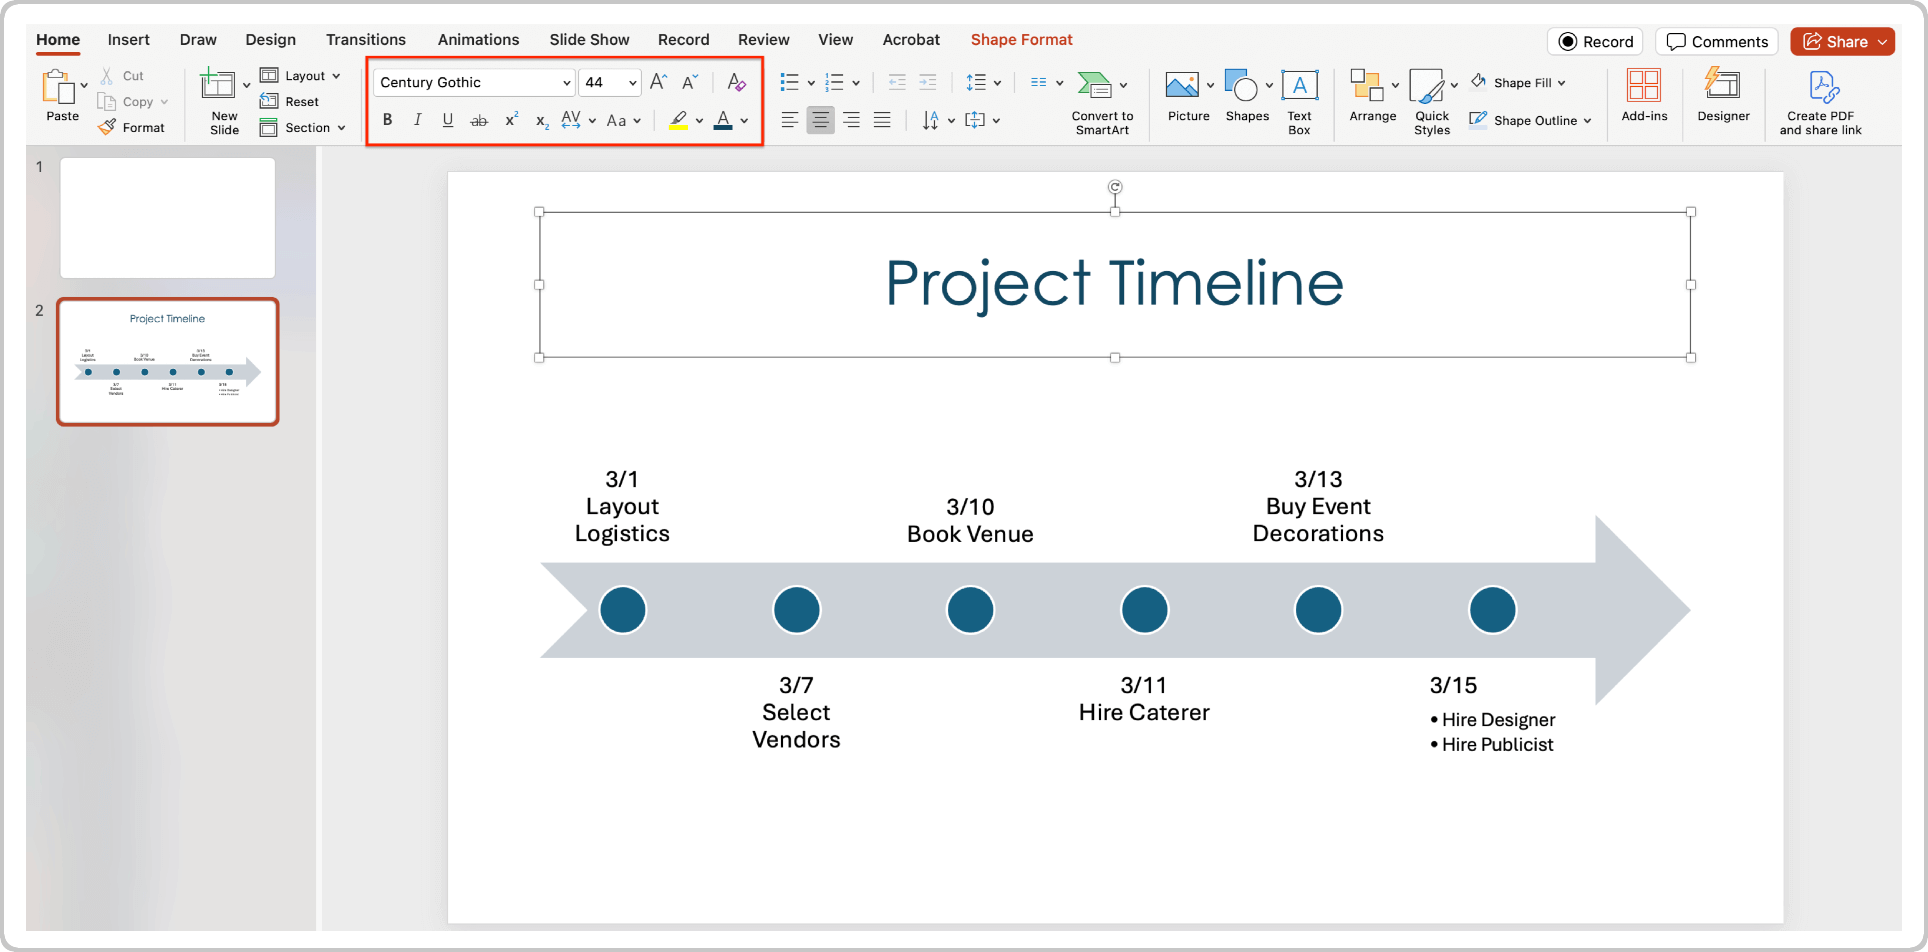
- Double-click the title field to add a title to your timeline. Change the font, size, color, and alignment in the mini toolbar box.
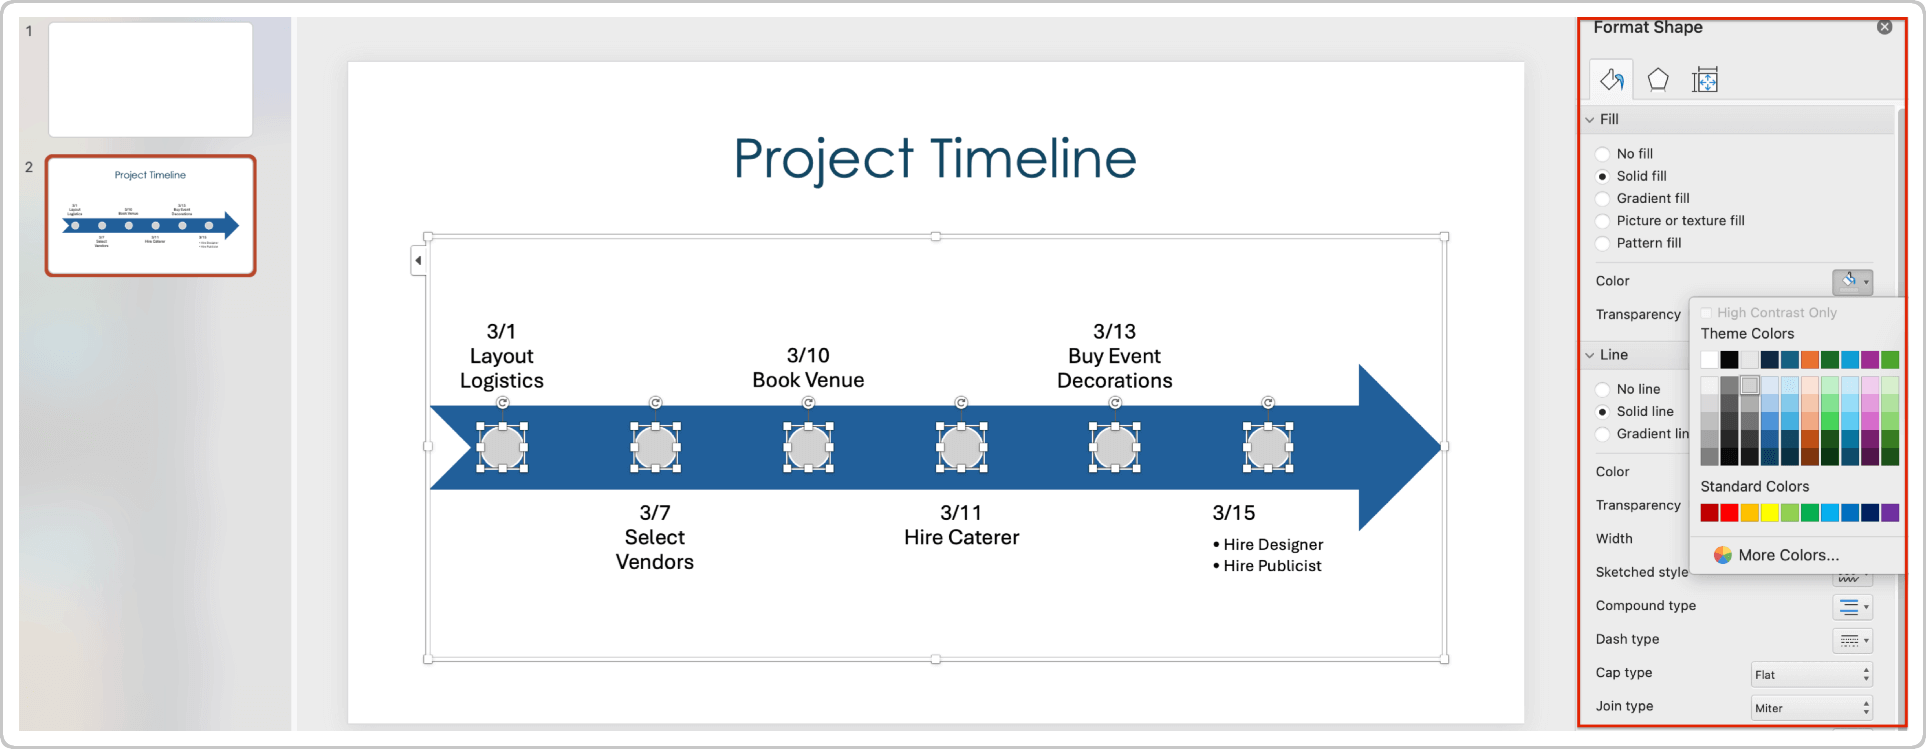
- Right-click on the arrow, click Fill, and choose from the Theme or Standard Colors to select a new background color.
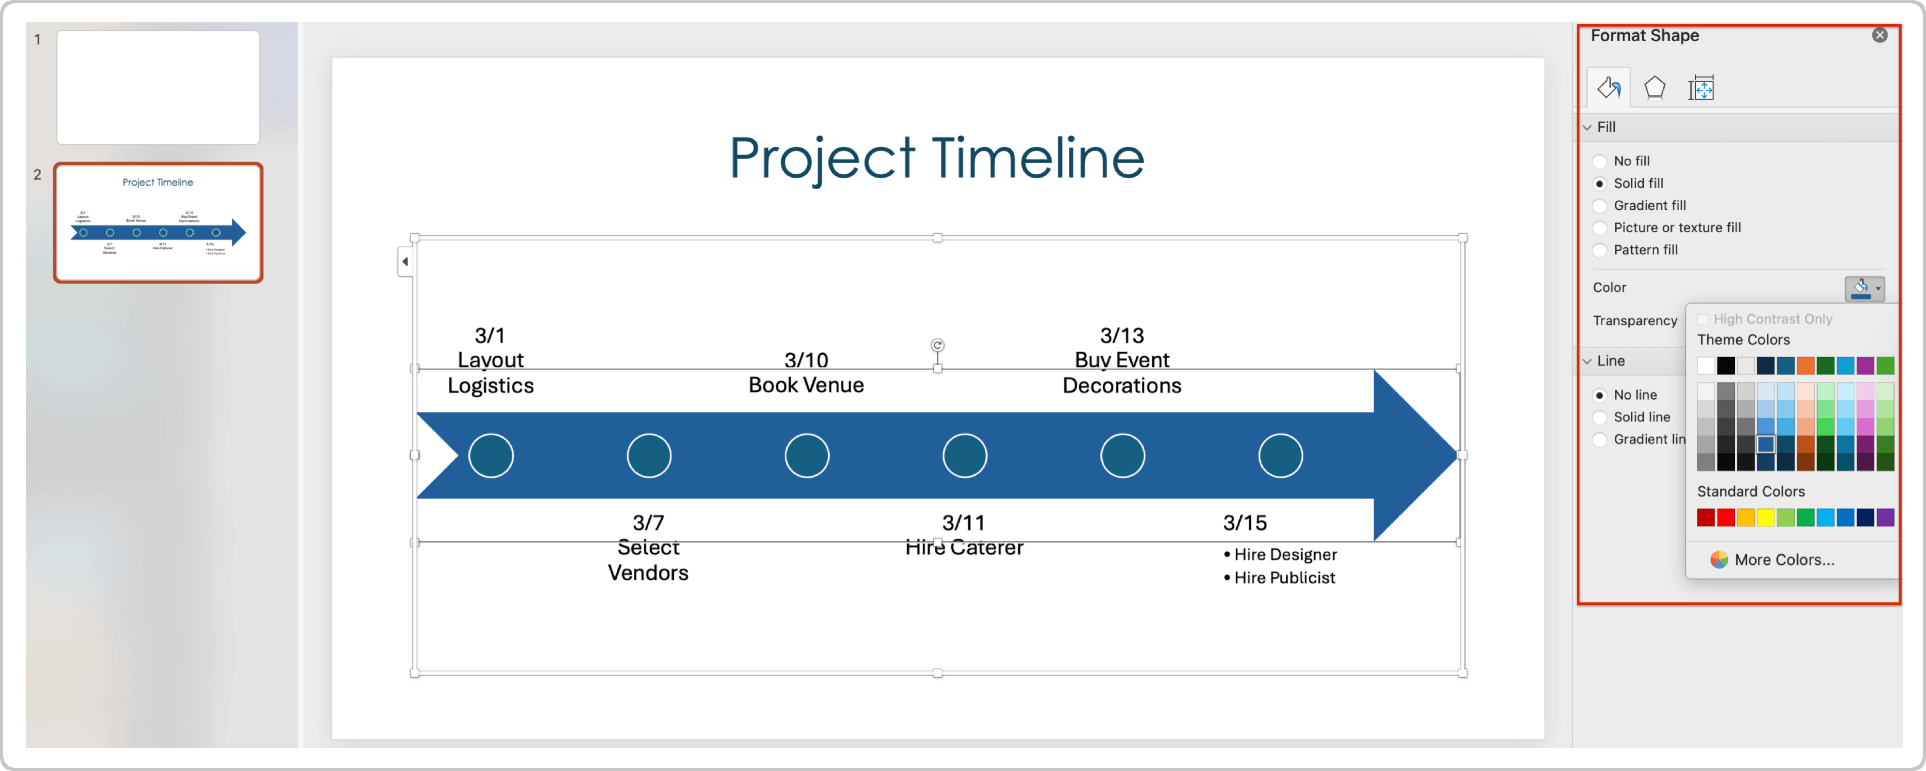
- To change the colors of the circles on the timeline, click on a circle, hold down the Shift key, and click the other circles. Then, right-click on a circle, click Fill, and choose from the Theme or Standard Colors to select a new color.
- Click on a task to open the Type your text here box, then click and highlight all tasks in the box to change the font and size.
Use Transitions to Make the Timeline Dynamic
To make your timeline more dynamic, use slide transitions from the Subtle, Exciting, or Dynamic Content categories in the expanded Transitions tab. Apply these transitions to a single-slide timeline or break up tasks or dates across multiple slides to reveal them one after the other. Most PowerPoint versions support transitions.
Check out this collection of PowerPoint project timeline templates to help you visualize and present project task durations, milestones, and deadlines.
How to Choose the Right Layout
To choose the right timeline layout, consider how you want to show progress, tasks, and key dates over time. Your design should match your project's flow, fit your slide space, and reflect how much detail or repetition your timeline needs to show.
Here are the layout options to consider:
- Horizontal/Linear: This option is best for showing a clear path or a short sequence of events from left to right. This layout fits well on wide slides and helps viewers follow progress at a glance.
- Vertical: This layout works well when space is limited or when you want to list steps from top to bottom, such as task lists or project phases. It focuses on each item and works well on mobile or printed handouts.
- Circular: This option works well for showing repeated steps, cycles, or processes that repeat from one stage back to the start. It’s a good option for continuous flows, such as feedback loops, review cycles, or yearly processes.
- Custom: You can also build a timeline from scratch that fits your needs, combining shapes, text, or colors in a unique format. Custom layouts are helpful when highlighting key events or blending multiple timeline types on one slide.
What to Avoid When Creating a PPT Timeline
To create a clear and helpful timeline in PowerPoint, avoid design choices that clutter the slide or confuse your audience. Keep the design simple, the text easy to read, and the flow of tasks or dates easy to follow from start to finish for the best results.
Here are common things to watch out for and avoid:
- Overcrowding the Slide: Too many tasks, dates, or design elements can make your timeline hard to read. Aim for a clean layout with precise spacing between items.
- Small or Hard-to-Read Text: Fonts that are too small or fancy can distract viewers. Use a simple, readable font in a size that's easy to scan.
- Inconsistent Styles: Mixing too many colors, shapes, or fonts can make the timeline look unorganized. Stick with one style to keep things clear and professional.
- Poor Color Contrast: Light text on a light background or dark on dark makes content hard to see. Choose colors that stand out from one another.
Check out this collection of free timeline templates to help you communicate visual timelines for multiple uses and formats.
Download Free PowerPoint Timeline Templates
Check out this collection of free PowerPoint timeline templates to save time and visualize project task schedules, strategic plans, and more. The roundup includes sample versions of a basic, 30-60-90-day plan, and Agile project timeline templates. You'll also find a Gantt-style yearly view, milestone timeline, and layout for multiple project timelines.
Interested in a way to plan, visualize, and update work in real time? Learn more about the best software for a project timeline.
Easily Create a Timeline in Smartsheet
Timeline view in Smartsheet empowers users to plan, visualize, and collaborate on date-based work in real-time, enabling you to effortlessly organize tasks, track progress, and communicate status.
In just a few clicks, launch your project’s timeline on any sheet to visualize your work, understand the details, and adjust information, making it easy to track project progress, detect blockers, and communicate statuses.
Discover how timeline view in Smartsheet can help your team visualize date-based work and achieve greater efficiency and transparency across projects.
Learn more about timeline view in Smartsheet.
PowerPoint Timeline FAQs
PowerPoint makes it easy to create clear, custom timelines using built-in layouts, SmartArt, and formatting tools. You can show tasks, dates, or phases in a visual flow, adjust styles quickly, and add transitions for impact. It's flexible, familiar, and works well for sharing timelines with any team.
Learn about the benefits and features of project timeline software to help your team visualize project planning, manage tasks and resources, improve collaboration, and more.
PowerPoint timelines can be challenging to update once designs get complex or crowded. It lacks built-in project tracking or real-time updates, and SmartArt has limits when customizing layout or animation. Timeline tools with scheduling or task management features may work better for large or changing projects.
PowerPoint does not support linking timeline dates in SmartArt directly to Excel. You can copy data or create linked charts, but you'll need to edit SmartArt timelines manually. Try using charts or embedding Excel tables that sync with your spreadsheet for live updates.
Smartsheet is a go-to solution for teams that want a more interactive, collaborative way to build timelines. Use Timeline view to easily group tasks, map project phases, and share real-time updates. Smartsheet works well for roadmaps, campaigns, and managing details across large teams or portfolios.
Use this step-by-step guide to create a timeline in Smartsheet to learn more about accessing, configuring, and customizing a sheet in Timeline view.

